Friday, July 30, 2021

Gathering Seeds

Before you can start a garden, you have to gather seeds.  Those tiny little things that when planted in moist dirt will germinate and grow into a rainbow of flowers.  Before you can start your creativity project, you have to gather seeds.


In creativity, a seed is an idea of what you want to do.  No matter what it is -paint a picture, sing a song, write a poem, decorate a table - you have to start with an idea.  Sometimes, if you are lucky, you are overwhelmed with ideas.  I will have to take fabric with me to eternity to complete all the quilt ideas I have.  That is the only way I will have enough time.  But there will be those of you who won't have a clue as to what you want to grow.  You need the seed.


Now with plant seeds, you can gather them from plants that after blooming produced seeds for the next season.  Or you can buy seeds nicely packaged in colorful envelopes in a store.  To gather seeds for creativity, you have to search.  You have to go out and gather the seeds.


It's not hard but it does take a little time. I recommend at least an hour a week.  Try to find an hour -preferably by yourself - and go on a gathering. You don't have to go anywhere special, these seeds can be gathered anywhere:  a museum, a concert, a park, a dollar store.  


What you are looking for are things that make your heart sing. Let's say you see a plastic flower arrangement that looks cute far away but up close looks tacky.  Take the idea - the seed - and arrange your own.  Use live flowers, use flowers from arrangements you have at home that you are tired of, use the idea and put it on canvas or as an appliqué for a quilt.   The image of that cute but tacky arrangement is the seed.


Go some place that makes you feel good. Go some place you have never been.  Try somewhere with a slightly different cultural fragrance, maybe a restaurant or an import store.  If you can't get out of the house, read magazines you don't normally subscribe.  I read lots of environmental, psychological, and quilt magazines.  So for me, a Better Homes and Gardens or Martha Stewart Living is a whole new world.  For you, it may be the National Geographic, Psychology Today, or Newsweek type.  Do anything you can to gather those seeds. 


Now this doesn't mean you have to act on them right now. That you have to come home immediately and start a new project. You may want to but it is not necessary. You are just gathering seeds.  They may need to stay buried in the moist dirt of your mind a while before they can germinate. You may find that you need to gather several seeds and are able then to put them all together to create a whole new flower.


You can't have a garden without seeds.  You can't have creativity without ideas.  So to allow your creativity to germinate and grow, go out and gather seeds.   And you might along the way want to pick up a couple of packet of seeds for a real garden.  Your own flower garden could help to inspire your creativity as well.


© 2017, 2021 – Cheryl Fillion

Friday, July 23, 2021

A Bit of Yoyo History – More Yoyo Uses

Along with the table matts and ornaments I showed you last week, I like to make flowers out of the yoyos.  Just the shape and texture of a finished flower gives it the look of a flower.


Sometimes for the center of the yoyo I will put a button but also a smaller yoyo.  The big yoyo is 2 inches in diameter, the center yoyo is ¾ inch. 


The yoyo flowers in the first picture above are actually pins.  Just sew (or glue) a small safety pin or a jewelry pin you can buy at a craft shop to the back.

Besides pins, you can use yoyo to embellish other items of clothing.  I like wearing pins, so the only yoyos I have on clothes is on a sweatshirt jacket I made many years ago. 


Most of the time when I make yoyos I do it the old fashion way but cutting a circle, stitching the edges and then gathering the stitches, (Next week’s blog will be a tutorial on how to make a yoyo), but there are yoyo maker out there that help people make yoyos.  There are various size round yoyo makers and some that are shapes.  I have two heart yoyo makers (when you have a blog and a business entitled Heartfully Cheryl you have to have heart shaped yoyos.).

I use the heart shaped one in various ways which I will show you but a favorite has been embellishing my hat.  Living in Texas you have to have a hat at times but you don’t want just a plan one.  I have two sizes to the heart yoyo makers and I used both of them here.


Now since we usually talk about yoyos in relation to quilts, how can yoyos be used in quilts.  One way I used them is to make designs.  The heart and the peace sign are my two favorite designs.  I arrange them on fabric, take a little glue stick to temporary keep them in place and then applique them down.  The wall hanging pictured use my tiny ¾ inch yoyos.


Here is how I used the heart yoyos in a wall hanging.  This is called When Peace Shines, Love Blooms.


And yoyos are a great way to give texture and interest to a solid area.  Santa would look great with just a piece of fabric for his beard, but the yoyos give it a little texture.it is hard to see in this picture but there are read and green yoyos along the rim of his cap as well as a yoyo for the cap tassel.  


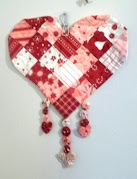
And who says a wall hanging has to remain square or rectangle.  Here is a heart shaped wall hanging with yoyos hanging from the edge.  There are 3 little round yoyos with a heart yoyo at the end.


So, you see you don’t have to just make a yoyo quilt to have fun with yoyos.  You can use them for all kinds of things and in all kinds of ways.  Next week will be a tutorial on how to make a yoyo (the old fashion way).  I hope this gets you yoyoing.

© 2021 Cheryl Fillion 


Friday, July 16, 2021

A Bit of Yoyo History - Tutorial


Fabric Yoyos are simple to make.  You can go to your local fabric or craft store and find a tool that will help you make all kinds of size or shape yoyos.  Or you can make them the old fashion way with just a circle of fabric.  If you are sewing the yoyos together for a quilt or table mat, you might want to make all the yoyos the same finished size.

To determine the size of circle to start out with you need to know the finished size you want then cut a circle 2 times plus 1/2” (for seam allowance) of that finished size.  For example, if you want a yoyo 1 1/2” in diameter, cut a piece of fabric 3 ½” in diameter.    


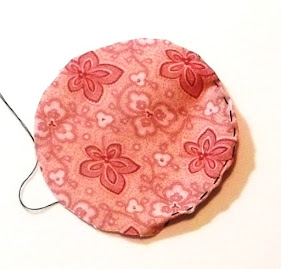
Now fold over the edge (about a ¼” ) of the circle to the wrong side of the fabric and start a running stitch like a basting stitch around the circle. I hide the knot of my thread under the fold of the edge.  (I usually use the same colored thread as the fabric but I am using a contrasting thread here so you can see the stitches.) You can iron the edge down before you start sewing or just fold it over before you take the next stitch.


I double my thread to make it stronger to pull the gathers.  But if a single thread works for you, go for it. 

One tip I learned is to make the stitches not tiny like quilting stitches but bigger. Mine are usually about ¼”. When the yoyo is finished, there will be a hole where the stitches are gathered. The bigger the stitches, the tinier the hole.   


You can gather the stitches as you are sewing or wait until you get to where you started stitching.   


Then gather up the circle and knot it. I try to get the knot as close to the gathers as I can, then pull the thread through the gathers before I cut it off.  You don’t have the tail of the knot showing in the opening that way.  


You will probably need to flatten the finished yo-yo out after you have cut the thread. You might have to adjust where the edge fold goes to get the hole in the middle.


And that is your yoyo. Now just make however many more you need for your project.

To sew the individual yoyos together , Arrange them in the way you want them.   You can have them so all the gather holes show or have them so that the flat side shows.  Usually I want to see the gathered holes.  I think it is more interesting and more textured.


But occasionally when I am doing an ornament where it might swing around on the hanger, I will alternate the yoyos: one gathered next to one that shows the flat side.  It makes it more symmetrical.

Now to sew to sew the yoyos together: Pick up two yoyos.  If you have all the yoyos facing with the gathered side up, you want to place the flat sides together.  If the yoyos have the flat side up, you want to put two gathered sides together.   If you are alternating a gathered side with a flat side, the yoyos you place together should be a gathered against a flat side.

Now slip your needle through the hole and under the gathers coming out at the edge of the yoyo.

Pull the needle through so the knot is hidden in the gathers.  Pulling the needle through the second yoyo, take a little stitch securing them together (Note: I usually use the same colored thread as my fabric. I am using contrasting thread here so you can see the stitch.)


Take a couple more little stitches to secure the yoyos together.  Make a knot slip the needle through the gathers of the yoyo (like you did when you created the yoyo) and lcip your thread.  That is all there is to it.  Now just repeat the stitches for all the other yoyos until you are finished.


Here is my completed ornament.

©2016, 2021  Cheryl Fillion


Friday, July 2, 2021

A Bit of Yoyo History – Yoyo Uses

If you are not one who will make a yoyo quilt, how could you use yoyos?  There are so many ways. 

 You can make a place mat or table matt with the yoyos.  The matts can be square or rectangle


But they can also be whatever shape you can imagine – a diamond shape or even a pumpkin


I use yoyos for a lot of Christmas ornaments.   You can make one big yoyo out of holiday fabric and if you make it big enough, you can use a big print fabric.  The yoyo below is finished at about 3 inches in diameter.


You can sew four yoyos together, alternating the yoyos so there are two gathered sides showing and two smooth sides.  I usually string a thread through one yoyo so it appears like a diamond shape.  These yoyos finished at an 1 1/2 inches.  


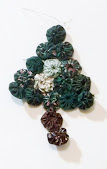
 Or sew them together in a design like a tree or candy cane.  (These yoyos are about ¾ inch in diameter).  Or use different sizes for a snow man (the biggest yoyo here is 2 7/4 inch in diameter.)


You could also stack the yoyos.  With this little tree, I put a little stuffing in each yoyo so it puffed up a little.  The yoyos increase in size as the tree gets bigger.  The top yoyo finishes at 1 inch, the bottom at 3 inches. 


I will show you more possible uses next week. 

© 2021 Cheryl Fillion