Showing posts with label punchneedle. Show all posts

Friday, November 1, 2019

Cookie Cutters Aren’t Just For Cookies


It is starting to be that time of year where we think of holiday goodies.  But I am one who does do much baking and yet I have dozens of cookie cutters.  You see you can use cookie cutters for more than just cookies.  They are great shapes for kid’s crafts, appliqué, needle felting, punch needle and embroidery.
'


I use pumpkin, bell and stars for kid’s crafts at the market.  I trace the cookie cutter on to paper, scan them on my printer so I can enlarge them to the size I need (although I have pumpkin cutters in just the size I needed).   I print them out on cardstock, cut them out and punch a hole in the top then add yarn for a hanger.  Give them to the kids to glue whatever they want on it or just color them.  I was given pompoms of various colors so we have been using those.


I have also used them for appliqué.  Again just trace the cookie cutter; cut it out on fabric and sew it down.  I like the cat and witch cutters my mom had as we were growing up.  They were great appliqués for my Halloween quilt (which one of these years I will finish).


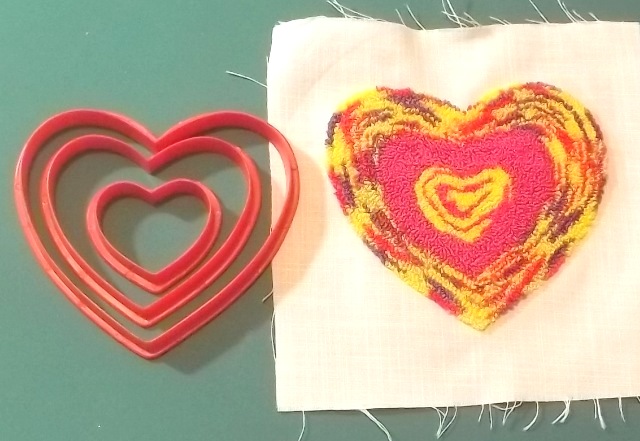
I enjoy punchneedle embroidery.  Recently I found some tie-dyed embroidery floss and wanted to see how it would look stitched out.  So I took several sizes of my heart shaped cookie cutters and made myself a little heart ornament using the floss.

Of course you can also use the shape for some simple red work (or any color) embroidery.  Again just trace the cutter (if desired, you can enlarge it as described above), get out your hoop, needle and embroidery thread, and stitch away.


Cookie cutters are also a great shape for needle felting which is my favorite way to do needlefelting. .  As long as the cutter is open on both ends, you can place your roving in the cutter and needle felt until the roving takes the shape of the cutter.  Then once you have finished felting it, you can use it as an appliqué, stick a thread hanger through it for an ornament or glue a magnet on the back and put it on your frieg.  (I’ll have a future blog concerning needle felting in a shape.)


Making sugar cookies are so much fun and decorating them with children creates memories but using your cutter with fabric and thread (or glue and pompoms) is a way to keep the cookies forever.  Cookie cutters aren’t just for cookies anymore.


© 2016, 2019 Cheryl Fillion


Friday, June 22, 2018

Punchneedle Embroidery – Other Fabrics


I earlier wrote about the fabric best used for punchneedle embroidery: weaver’s cloth.  It is a woven poly-cotton blend fabric.  Being woven the needle slips between the threads of the cloth to form the punchneedle loop and since it is a poly-cotton blend when the fabric is taken out of the hoop, it closes in around the stitch loops and holds them in place.

Weaver’s cloth is the best fabric but it is not the only fabric that can be used.  Just about any fabric can be used for punch needle.  Cotton as well as a 100% polyester fabric has been used but since the needles are so sharp, they can tear the threads of the fabric. 

One of the other secrets about weaver’s cloth is that if you ever have to take out some loops you can easily iron (or rub with your finger nail) the holes where the stitches were and it will look like no stitches were ever there.   With cotton if you have to take out the stitch loops, you might have a hole that can’t be repaired.  And cotton or polyester fabric doesn’t have a stretch to it like a poly cotton blend, so when you take it out of the hoop it won’t close around the stitch loops and hold them in place.

But there is a way to fix that.  All you have to do is use a woven interfacing.  Iron it to the back of the fabric and it will help hold those stitches in place just like the weaver’s cloth does.  Remember the design in punch needle is drawn on the back of the fabric and you stitch from the back.  So when using woven interfacing draw the design on the interfacing and then iron it on to the fabric.  You could use other types of interfacing but like cotton or 100% polyester fabric, it will tear when the needle goes through it.

Cotton with woven interfacing


Front of cotton


Cotton and polyester are not the only fabric to use the woven interfacing with.  You can use it on knit or jersey if you want to punchneedle a design on a baby outfit or a t-shirt. I even tried it on a velveteen fabric without using the interfacing.  It looked OK but I wouldn’t do it again. 


velveteen back


velveteen front

I read somewhere about other fabrics like tulle, denim, aida cloth (used for cross stitch) needle point canvas and even perforated paper.  I found it had good results. Perforated paper is a light weight cardstock with holes punched it in at regular intervals so you can add stitching to cards or scrapbooks. After you have punched a design, just cut the design out of the paper around the punching (leaving one hole of the paper past the design to hold the edge stitch loops in place) and then glue it to the cardstock.  The fact that it is glued to another paper will prevent the stitches from coming out.


Aida back


Aida front


Needlepoint canvas - back


Needlepoint canvas - front


Perforated paper - back


Perforated paper - front
The one thing about the fabrics I listed above is that you have to be aware of the size needle you use with it.  You wouldn’t want to use a 6 strand or large needle on tulle which is likely to tear the tulle and a small or 1 or 2 thread needle would have a hard time going through denim.

The best advice with using other fabrics for punchneedle is to try it.  Take some fabric, use it with or without woven interfacing and see if you like the results.  I would try it with what ever thread you use the most often (for me that would be embroidery floss).   Since you know how that thread looks on weavers cloth, it will give you a good comparison to how it would look on other fabrics, canvas or even perforated paper

©2018  Cheryl Fillion


Friday, April 27, 2018

Punchneedle Embroidery – Technique


Punchneedle embroidery isn’t really that hard once you know the technique and remember a couple of rules.

Rule 1 is you work from the back of the design.  Most embroidery you are working on the front surface of the fabric but not with punch needle.  You work from the back so the loops appear on the front. 

            
Back of fabric


Front of fabric

The second part of Rule 1 is to remember that your design will be reversed from the front to back. You notice the hearts of my logo are in different positions in the pictures above. This usually doesn’t matter unless you are using words.  Remember to reverse your letters so they come out in the right direction on the front.  That means when you are punching, all the letters will be backward.

How you want your letter to look

How letter show look on the back
 to be punchneedled

Now once you have picked your design and color and type of thread (many people use embroidery floss), put the fabric in your hoop.  Remember Rule 1 make sure the design of the fabric is facing up. Rule 2 is that the fabric should be as tight as you can get it in the hoop.  This allows the threads of the fabric to stretch apart (although you really can’t see it). When you are done punching and take the fabric out of the hoop, the fabric threads will tighten up around your punching.

Before you thread the needle make sure you have it at the loop length you want it.  This can be determined by either the dial or the shaft tube which ever comes with your needle so read the instructions that came with whatever needle you are using.


Once your needle is threaded (I won’t show that here because each needle is slightly different so follow the instructions that came with your needle), you are ready.  You don’t have to put a knot in the thread to keep the thread in the fabric.  Trust me as long as you don’t pull on the thread from the back or working side, the loops will stay in place. Rule 3 is that the beveled or angled edge of the needle needs to be facing in the direction of the stitching.


Beveled edge of needle


Holding the needle (beveled side) in the direction you want to go, push/punch the needle through the fabric. Now gently pull the needle back out from the fabric but don’t lift it too high off the fabric.  If you do that you will have a loop on the working side.  You don’t want that. Now move the needle (in the direction that your beveled end is), just s couple of fabric threads and punch again.  Pull it gently out, move a couple of fabric threads and punch again.  (excuse my drawing - I am not the best at making diagrams but I wanted to give you an idea of how punchneedle looks. It is hard to give a cross view of the work with a photo).


You want your stitches next to each other but not touching.  If the stitches touch, the fabric will buckle or roll when it comes out of the hoop.  Now keep stitching until the area you are working on is filled in. I usually cut the thread with just a tiny tail. You don’t need to knot this end of the thread either.  Once you take the fabric out of the hoop, the fabric threads will hold the loops in place.


That is punchneedle embroidery in a nutshell. Now I do have a warning for you.  If you end up enjoying it, you will be addicted.  And if you are like me, you will end up with more projects you want to do than time to do it all in.


©2018 Cheryl Fillion


Friday, April 20, 2018

Punchneedle Embroidery: Threads and Hoops


We are continuing our discussion about punchneedle embroidery.  The last blog talked about the needle and fabric used.  This blog will be about threads and hoops.


The thread most often used for punch needle is embroidery floss, particularly the 6 strand type.  This allows you to separate the strands and use them in different size needles. (remember I said that punch needles come in different sizes, most often.for 1, 2-3, and 6 strands).  I like using embroidery floss because it is the cheapest thread, comes in a wide variety of colors and is easy to obtain (plus it tends to be what I have for my other embroidery).

Different numbers of floss strands used
Perle cotton can also be used.  It will definitely make a bigger and more defined loop, plus it will have a satin looking sheen to it.  Wool threads give a softer appearance and looks wonderfully if you are punching an animal figure.  Silk or Rayon floss gives a definite satin look to the loops.  And I have even used 2-ply acrylic yarn which gives a soft plush look and is used in a medium (or 2 stand) needle.

Depending on the size of your needle, you can try any type of yarn or thread.  If it fits through the eye of the needle without snagging it, it will punch.  I have used ordinary sewing thread and what I really like is metallic thread or floss.  It won’t unravel like it would with regular embroidery because you are not pulling the entire length of the thread through the fabric.
Different threads I have tried and the different size needle (6-large, 3- medium, 1-small)


Hoops
Now for punchneedle to work the best you have to have the fabric as tight as it can be so it needs to be in some sort of a frame or hoop. Regular wood or spring ring embroidery hoops don’t work as well.  They don’t hold the fabric taut and the fabric tends to loosen as you punch.  If you have no other choice, you can wrap the inner ring of a wooden embroidery hoop with yarn and that will help grab the fabric you put in the hoop.
 
One hoop that is often used is called a lip hoop.  There is a lip on the inner ring which helps the fabric to be stretched tightly in the hoop and not slip.  Now it does leave a hoop mark (crease) on the fabric when you remove it from the hoop.  That can often be ironed out.
Lip Hoop


A second hoop is called a fitted inner ring hoop also known as a tongue and groove hoop.  The inner hoop has a raised area round the entire ring and it matches with a groove in the inside of the outer ring.  When those two are fit together they hold the fabric tightly in place.

Fitted inner ring hoop - inner hoop (or tongue part)
Fitted inner ring hoop - inside outer hoop (or groove part)


A third hoop, or in this case a frame, is called a gripper frame (sorry I don't have a picture of this one).. This is not like an adjustable hoop.  It is often a wooden frame which has little gripper wires sticking out from it.  It ‘grips’ the fabric which holds it in place.  It is similar to what rug hookers use.  It reminds me of the cotton carders used  to separate cotton fibers for spinning.
 
So there are the different choices of thread and hoops you can use. Next week: Pumchneedle Embroidery: Technique- the dos and don’ts


© 2018 Cheryl Fillion


Friday, April 13, 2018

Punchneedle Embroidery – Needle and Fabric

Needles for punchneedle embroidery are much different than needles used for other types of embroidery.  They tend to be a bit bulky to use but they create such a wonderful texture embroiderers tend to forgive the needle.

Super Luxo Punchneedle

Needles
There are various brands of punchneedles on the market.  I use the Super Luxo.  When I started it was the one available in my area.  It is all metal (handle and needle).  It is heavy to hold (since it is all metal) but I am used to the weight of it now.  You need to get the brand that you like and can afford.  You will notice in my photo I have a rubber band wrapped around the handle.  I found when I laid the needle on a table, it tended to roll off the table and on to the floor, which dulled the needle point.  So I use the rubber band to keep it from rolling away.

What ever brand needle you use they are all the same. It’s a hollow needle with an angled tip and the eye drilled above the point.  You don’t have to pull the entire length of thread through the fabric as you do with other embroidery or sewing so the thread doesn’t fray.

Angled or beveled tip
hole above the point


The needles come in various sizes. Small using one strand of embroidery floss   medium using 2-3 strands or large using 6 strands(the size for the above pictures is for 6 strands.).  There are different types of needle available.  Some with each size needle sold separate or with one needle holder and the needles themselves are interchangeable (Super Luxo is one where the needle tips are interchangeable). 
The loop size is depending on the needle as well.  Some needles have a dial which adjusts the needle length while others use a little piece of plastic tubing placed on the needle shaft to act as a stopper for the needle.  (By the way the needle tip in the picture below is for 2 strands of floss)
Needle with tube
Fabric
The fabric most often used is known as Weavers cloth.  It is a cotton-polyester blend (45% cotton and 55% polyester).  This blend allows the fabric to be resilient enough to punch but doesn’t tear the fabric (unless your needle tip is dulled). The needle tip tends to push aside the threads of the fabric when it punches through the fabric.
Weaver's Cloth

Other fabrics tend to stretch when punched and do not have a weave that allows punching.  They also don’t return to the original size when stretched in the hoop such as weavers cloth.  So weaver cloth is recommended for beginners but as I will show in a future blog, there are ways to punch other types of fabric.

Next week threads and hoops.

© 2018 – Cheryl Fillion


Friday, April 6, 2018

Punchneedle Embroidery – What is it?


Punchneedle embroidery is an area of small loops ‘punched’ into tightly woven fabric with embroidery thread.  The difference between this and other embroidery is that there is only one stitch, a hollowed needle is used and the design is worked from the back of the fabric.
It has been around for a very long time. In fact samples of the needle were found in ancient Egypt and were made of hollow bird bones.  It has been very popular in Russia which is why it is sometimes known as Russian Punchneedle. When a Russian group known as the Old Believers migrated to the US, they brought along this form of embroidery.
It is actually very easy to do, as I mentioned there is only one stitch.  Projects tend to be small so they are finished quickly.  It is rather soothing to do because it is very repetitive.  And there are very few rules.
So how do you do it?  Once you have the needle threaded (that tends to be the most difficult thing to learn) you ‘punch’ the fabric from the wrong or back side of the fabric.  The needle is then just barely pulled out of the fabric to move it forward and another punch is made. This then means that the design is printed on the wrong side of the fabric but the loops show up on the front of the fabric and that is how the design is developed.
No knots are needed to keep the thread in the fabric. The loops stay in because of the friction of the thread and the fabric and when the fabric is released from the hoop, it goes back to an original state and tightens around the loops, which is why you need tightly woven fabric known as weaver’s cloth.

Here are some examples of punch needle embroidery.


Heartfully Cheryl logo


Rose


Ribbon piece on basket


Hearts - design drawn from cookie cutter


Punchneedle doll


The next couple of weeks we will look at the supplies and technique of punch needle.

©2018 Cheryl Fillion


Friday, February 9, 2018

I Make Dolls

I make dolls.  I have made dolls for over 30 years.  But I never really considered myself a doll maker until recently.  I usually made dolls to do other crafts. 


Since I am a fiber artist, most of the dolls I make are cloth dolls.  Cloth or rag dolls (often called that because they were made and stuffed with rags) have been around for thousands of years.  The earliest one know is about 1700 years old.  It was found in a grave from Ancient Rome and was made of linen.  There are not many cloth dolls around because they were literally loved to pieces,

My doll making actually started with teddy bears.  I found a wonderful pattern and began making bears for gifts and for charity.  I've given dozens to homeless and abused women shelters for the children staying there

A flowered bear

I then found a pattern for little felt bears.  Felt was wonderful to use because it doesn’t fray.  The fun part of these bears was you could dress them in various outfits.  I made a lot of these as gifts creating outfits to fit the recipients’ personality.


I think my first doll was from a fabric panel.  Panels often have all the parts of a doll or animal printed on the fabric including the instructions. You just cut them out and sew them up.  What I liked about this doll was more the embroidery than the doll.  At the time the doll was just to show off the embroidery I did.


Embroidered Fabric Panel Doll
Closeup of embroidery
Even though I had made a doll, I still didn’t consider myself a doll maker.  Then one Christmas break while visiting my mother in Wisconsin, she found a class at a local quilt shop that we could take.  Taking a class together was something we always wanted to do but usually by the time I would get to her house for the holidays, there weren’t any classes available. The class was to make an Angel doll.  Mom collected angels so this was perfect for her.

Angel Dolls - Mom's is on the right

Then around 2000 I was reading a book on creativity and there was an exercise called the Creativity doll.  The idea was to create a doll that represented something you wanted in your life: love, marriage, increased income, etc.  Think of it as putting a wish into a 3 dimensional form.  I wanted to be more of a free spirit so I made the doll following a pattern but her outfit was designed as I went along.

My Creativity Doll
 
I then began reading up on dolls: creativity dolls, healing dolls, dolls children could make and began to make more and more dolls  I finally called myself a doll maker  But still my dolls represent different types of fiber techniques.

I have made a doll using colored pencil on fabric.

Colored Pencil on Fabric Doll

I have made woven dolls.  This was actually a challenge from my Fiber Artist group.  We had to create something using the bead and the fiber I used as the hair.  The sequins were actually part of the yarn.

Woven Doll

 I have done dolls in punchneedle embroidery.

 
Punchneedle Embroidery Doll


And my latest was the embellished doll I did during my birthday creativity retreat last year.

Embellished Doll

Dolls remind me of my childhood and all the play involved with dolls.  I still feel I am playing when I make dolls.  But doll making also inspires my creativity and imagination. It’s a challenge to see what type of artistic technique I can use with a doll and that then leads me to use that technique elsewhere.

You don’t have to consider yourself a doll maker to create a doll.  I didn’t for a long time. But some time when you are stuff for what to create or you just want to play try making a doll.  And, hey guys, no one says you can’t make dolls.


©2018- Cheryl E. Fillion


Friday, November 10, 2017

Cookie Cutters Aren’t Just For Cookies


I wrote this last year and just love the idea of using cookie cutters for crafts; I had to post it again.


Cookie cutters used to be for Christmas but now there are cutters for every holiday or occasion you can imagine.  But you know you can use cookie cutters for more than just cookies.  They are great shapes for kids crafts, appliqué, needle felting, punch needle and embroidery.


Pompom pumpkin


I use pumpkin, bell and stars for kid’s crafts at the market.  I trace the cookie cutter on to paper, scan them on my printer so I can enlarge them to the size I need (although I have pumpkin cutters in just the size I needed).   I print them out on cardstock, cut them out and punch a hole in the top then add yarn for a hanger.  Give them to the kids to glue whatever they want on it or just color them.  I was given pompoms of various colors so we have been using those. 


Cat Pumpkin
Witch Pumpkin


I have also used them for appliqué.  Again just trace the cookie cutter; cut it out on fabric and sew it down.  I like the cat and witch cutters my mom had as we were growing up.  They were great appliqués for my Halloween quilt (which one of these years I will finish).

Punchneedle


I enjoy punchneedle embroidery.  Recently I found some tie-dyed embroidery floss and wanted to see how it would look stitched out.  So I took several sizes of my heart shaped cookie cutters and made myself a little heart ornament using the floss.

 
Needlefelted

Cookie cutters are also a great shape for needle felting.  As long as the cutter is open on both ends, you can place your roving in the cutter and needle felt until the roving takes the shape of the cutter.  Then once you have finished felting it, you can use it as an appliqué, stick a thread hanger through it for an ornament or glue a magnet on the back and put it on your refrigerator. 


Making sugar cookies are so much fun and decorating them with children creates memories but using your cutter with fabric and thread (or glue and pompoms) is a way to keep the cookies forever.  Cookie cutters aren’t just for cookies anymore.


© 2016, 2017 Cheryl Fillion