Showing posts with label doll. Show all posts

Friday, May 28, 2021

I Make Dolls

I am in the mood to make dolls and when I read a blog I posted a couple of years ago, I became even more inspired.  I thought I would repost this for you to read.

I make dolls.  I have made dolls for over 30 years.  But I never really considered myself a doll maker until recently.  I usually made dolls to do other crafts. 

Since I am a fiber artist, most of the dolls I make are cloth dolls.  Cloth or rag dolls (often called that because they were made and stuffed with rags) have been around for thousands of years.  The earliest one knon is about 1700 years old.  It was found in a grave from Ancient Rome and was made of linen.  There are not many cloth dolls around because they were literally loved to pieces,

My doll making actually started with teddy bears.  I found a wonderful pattern and began making bears for gifts and for charity.  I gave dozens to homeless and abused women shelters for the children staying there

I then found a pattern for little felt bears.  Felt was wonderful to use because it doesn’t fray.  The fun part of these bears was you could dress them in various outfits.  I made a lot of these as gifts creating outfits to fit the recipients’ personality.


I think my first doll was from a fabric panel.  Panels often have all the parts of a doll or animal printed on the fabric including the instructions. You just cut them out and sew them up.  What I liked about this doll was more the embroidery than the doll.  At the time the doll was just to show off the embroidery I did.

 Even though I had made a doll, I still didn’t consider myself a doll maker.  Then one Christmas break while visiting my mother in Wisconsin, she found a class at a local quilt shop that we could take.  Taking a class together was something we always wanted to do but usually by the time I would get to her house for the holidays, there weren’t any classes available. The class was to make an Angel doll.  Mom collected angels so this was perfect for her.


Then around 2000 I was reading a book on creativity and there was an exercise called the Creativity doll.  The idea was to create a doll that represented something you wanted in your life: love, marriage, increased income, etc.  Think of it as putting a wish into a 3 dimensional form.  I wanted to be more of a free spirit so I made the doll following a pattern but her outfit was designed as I went along.


 I then began reading up on dolls: creativity dolls, healing dolls, dolls children could make and began to make more and more dolls  I finally called myself a doll maker  But still my dolls represent different types of fiber techniques.

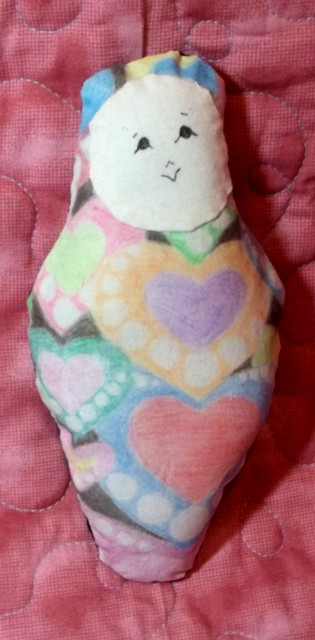
I have made a doll using colored pencil on fabric.  


I have made woven dolls.  This was actually a challenge from my Fiber Artist group.  We had to create something using the bead and the fiber I used as the hair.  The sequins were actually part of the yarn.

 I have done dolls in punchneedle embroidery.


And my latest was the embellished doll I did during my birthday creativity retreat last year.


Dolls remind me of my childhood and all the play involved with dolls.  I still feel I am playing when I make dolls.  But doll making also inspires my creativity and imagination. It’s a challenge to see what type of artistic technique I can use with a doll and that then leads me to use that technique elsewhere.

You don’t have to consider yourself a doll maker to create a doll.  I didn’t for a long time. But some time when you are stuck for what to create or you just want to play try making a doll.  And, hey guys, no one says you can’t make dolls.

©2018, 2021- Cheryl E. Fillion


Friday, March 12, 2021

My Colored Pencil Doll

Lately I have wanted to do more work with colored pencils on fabric.  A couple of weeks ago I posted my blog on the Japanese Doll Festival and that sparked me to make a doll.  So I combined the two urges and made a little pocket doll with colored pencils.


A pocket doll is simply a doll small enough to fit in a pocket.  I decided to make my little doll based on a cookie cutter I received as a child.  It had the design for the ‘cookie’ on the top of it and that is what my doll would look like.  (You might notice it is a pretty thick cookie cutter.  There was actually soap shaped like the cutter in it when I received it as a child.).  The cutter is about 2 ½ inches wide and 4 ½ inches tall.


Supplies needed


-- white or cream or off white cotton fabric.  You will want it at least 2 inches bigger than the dolls shape


--a piece of freezer paper the same size as the cut fabric.  Freezer paper can be found in some groceries in the wax paper/aluminum foil aisle. This helps stabilize your fabric so it doesn’t stretch or move when coloring it.  You can use a light weight iron on fabric stabilizer if you want.  You will remove the freezer paper when you are done.


--colored pencils – any brand will work. The more expensive brands might have a darker pigment.   


-- textile medium A textile medium is a liquid put on a painting that makes the painting permanent so if you wash it, the pigment will not come off or fade.  Often times it was put on oil or acrylic paintings so they would not fade if exposed to sunlight.  It is a little thicker than water and you brush it on the coloring and let it dry. This is more likely found in an art supply store or a craft store near the paint supplies or glues.


-- brushes to apply the textile medium and small container to hold a small amount of textile medium


-- backing fabric for the doll.  It needs to be bigger than the doll design at least by 1/4 inch for a seam allowance.


-- fiber fill to stuff the doll


-- needle and thread.  You can if you want to use your machine but something this small I usually do it by hand.


I started with white cotton fabric.  I cut it to 4 by 6 inches for fit the cookie cutter design.  I cut a piece of freezer paper the same size and ironed it shiny side down onto the back of the white fabric.  As I mentioned above this stablizes the fabric so it doesn’t move around when I am coloring the fabric.


 With this next part I wanted to try something different.  I wanted the design to be free handed.  I didn’t want the entire design to be trace from some other source.  I just traced the shape around the cookie cutter.  Since I didn’t want any tracing lines, I used a flesh tone pencil.  Much of the outer edges were going to be arms and legs.  Where the hair and dress would be, I was going to use a dark pencil so it would cover the flesh colored pencil marks.


Now the fun part – coloring.   When I color I first go one direction with my pencil over the space I am coloring and then I go over that color, with the same pencil, in the opposite direction.  So with the hair, I used brown going right and left and once that area was totally brown, I then went up and down.  I think it gives it a more even coloring.  You still see the pencil marks but not as prominently.


Once I am done coloring, I leave the freezer paper on the fabric and cover the entire piece with the textile medium.  I start off with only a teaspoon of medium and if I need more I will add it as needed.  Don’t worry that the medium is white coming out of the bottle, once it is spread on the fabric, it turns clear.  Let it dry and then peel the freezer paper off. I should mention that the dried textie medium does make the fabric feel still but the advantage of the medium is the colored pencil will remain permanent on the fabric.


To make the doll, I usually measure about ¼ inch from the edge of the figure and cut away the excess.  This ¼ inch area is your seam allowance. I am going to sew right along the edge of the colored line.


 But when I went to sew on the wrong side, I had a hard time see the color on the back.  So I taped it to my light box and trace in pencil the edge of the coloring.  If you don’t have a light box, tape the doll to a brightly lit window, it works the same way.


Once you have the doll cut out, you now have to cut out the backing fabric.  You could trace the cookie cutter again and color the back of the doll.  I like with my little dolls to sometime have other fabric to back the doll.  I have this set of woven fabrics that had just the purple I needed to match the dress.


I pinned the doll to the backing fabric (right sides together) and then cut around the doll. 


What was left was to sew along the trace line.  Make sure you leave a little opening to turn the doll right side out and clip the seams so all the curved seams are smooth (Don’t clip the sewing or the doll will come apart.  Take it from someone who knows.).  Stuff the little doll, sew up the opening and you have yourself a doll.


© 2021 – Cheryl Fillion

Friday, February 26, 2021

A Doll Festival

A couple of years ago I posted a number of blogs on fun holidays or festivals here in the U.S, and around the world.  The one I really enjoyed, as a doll maker, is the Doll’s Festival in Japan.  I am in need for some fun right now so I thought I would repost it again. I might even make a doll on that day.


In Japan on March 3rd, the Hina Matsuri, Doll’s Festival, is celebrated.  This is a day to pray for a young girl’s growth and happiness.  On this day girls host a party of tea and poetry for their friends and they serve little pink and green diamond shaped mochi (rice) cakes.


At the party is a display of dolls.  These aren’t dolls that the girls play with everyday but instead heirlooms that have been passed down for generations.  The display is a tier of shelves with dolls representing the members of the imperial court in ancient court costumes as well as pieces of furniture, small meal dishes and other things.


This used to be one occasion when little girls had their own parties.  The set was brought out for the day and quickly put away after March 3rd.  (It was thought that if it was not put away immediately the girl would have trouble marrying.)


No one really knows where the origin of this holiday came from but it is thought that it actually started with the Shinto religion.  On March 3rd a folded paper doll resembling a kimono known as a Kata Shiro would be cast into water and with it the user’s sins, illness and bad luck.


 I like the idea of a day to pray for young girls (there is a similar day for boys in May) but what really intrigues me is the doll display.  I have one baby doll of my mother’s and much of her miniature doll furniture.  I actually have some of the pieces displayed on furniture in my living room.  The furniture while made of plastic is very well made.  My favorite piece is a sewing machine which folds down into a cabinet just like the old Singer sewing machines did.  And when you turn the knob on the side of the machine, the little “needle” goes up and down.


Maybe if there is a special little girl in your life, you could tell her about the Doll Festival and find a way to display her dolls or toys on March 3rd.  The dolls and toys might not have the significance of an imperial court but it might show her that her possessions are just as important as she is.


©2018, 2021- Cheryl E. Fillion


Friday, March 20, 2020

Kid’s Crafts Revisited


With everyone being told to stay at home and not venture into groups, I wanted to repost the blogs I have done on crafts for kids (adults can do these too).  So here are some ideas to keep everyone occupied.  Just click on the blue underlined words and it will take you to the blog (a new window will open up for it).


Cookie cutters are a great way to create crafts.  They are not just for cookies.


Do you have fabric and a notebook?  Why not make a cover for it and write stories about what the kids are doing during this time?   It could make a great keepsake.


How about making some fabric yoyos? 


 \How about a spool doll and create a puppet show? 


You could also have adventures with a yarn tassel doll.  


And there are your hands or your kid’s hands – those can make wonderful designs to color.


And if you have some berry baskets or any open side container, how about decorating it up with colored yarn.  


And if you have some paper plates, they can make great spirals to decorate the house and yard.  You can also do the same thing with a circle drawn on construction paper or card stock.  Draw the circle first, cut it out and then follow the directions in the blog.


And of course, if you search the internet you can find lots of things to make with the kids or by yourself.   Happy Crafting.

©2020 Cheryl Fillion


Friday, June 14, 2019

I am a Reuser


You probably know the phrase “Reduce. Reuse. Recycle”.   Well my grandmother was a reuser before that was a thing.  She didn’t do it to save the environment or put less things in the landfill she did it to save money.  She raised 9 kids during the depression so every penny she could save counted.

Even after all the kids were out of the house, she had a big ball of string and twine that was made from smaller lengths tied together.  If she got a piece of string from something, she would add it to her ball.  She reused aluminum foil. Some of you might remember when TV dinners came in aluminum trays with a piece of foil over the top.  Well, she would save that top foil and reuse it.  She probably reused the aluminum tray but I don’t remember those at her house. I have already mentioned in a blog on embroidery that she would take her empty wooden thread spools and wrap her embroidery floss on it.

She used to make little trash cans (like the kind you would put near your desk) by taking 4 empty egg cartons and stand them on their sides and with the top (where the logo is) facing outward.  Then along the long edges she would, with pieces of yarn, sew them together to make a circle.  And then using round cardboard from my cousin’s take and bake pizza place she would glue this circle of egg cartons to it  And with that you then had a little trash can.  But she wasn’t done.  She would decorate the outside of the ‘trash can’ with pictures from greeting cards she had received.  As a little kid, I thought they were pretty cool.  I am sure my Mom and aunts and uncles didn’t agree but accepted them just to please her.

Well I am also a reuser.  Now I am not raising a big family but I do reuse to save money and to save things from the landfill. If something can be used, why throw it away and go out and buy something new.  I don’t make egg carton trash cans or have a ball of string but if I can find a use for something I will save it.

 I sort my buttons in empty peanut butter jars.  I reuse containers from my margarine.  They are usually big enough for a serving of spaghetti sauce or chili that I put in the freezer.  I am using a tray from a frozen dinner to hold my piece of foam when I needle felt.   I use tin trays from the Danish I buy to keep things like my spool knitted snakes while their googly eyes are drying after I glued them or to sort beads or buttons or mini yoyos.  They are also great as a paint palette.  Remember last year I used a berry basket from the farmer’s market as a summer kid’s craft.  

Well now I have another kid’s craft that reuses items.   If you are a sewer, you end up with empty thread spools.  Here is a fun little doll to make with basically two spools and some yarn.


To start out you need two spools of two different sizes.  The smaller spool will be the head, the bigger spool the body.  Now add together the length of each spool and about 3 inches, then double that length.  This yarn will be strung through the spools and part of it will be the legs.  


Now with a darning needle or a plastic kid’s needle, thread the yarn through one of the holes at the end of the big spool.  Now go up through one hole of the small spool. 


 Now that the thread is through both spools, thread it back down using another hole.  If you have a spool that has only one hole, you might want to thread the yarn through a button or a big bead before you put it through the hole, this keeps it from unthreading. 
Once you have it through both spools a second time, knot it together.  Again if you are using spools with one hole, add a button or a bead here to hold the yarn in place.  Then at the end of the yarn, tie a knot to be the little ‘feet’. 


Take another piece of yarn about 6 inches and tie it between the two spools, knot each end again for ‘hands’. 


With another 6 inches of yarn loop it through the yarn at the top of the small spool and make a knot at the end.   This is to either hang the doll or if a child’s (or adult’s) finger is through the yarn you can make the doll dance.  It also gives the look of hair. 


You can use any length yarn for body, the arms and the top loop but this is the minimum length I recommend.  If you make it so the legs and arms are longer it does give the doll a sillier look when you make it dance.

Now you can decorate the doll.  I usually use a mail label or a sticker on the small spool to make a face.  And you can glue fabric, or use decorative tape to the big spool for clothes.  You could add another mail label and let them decorate it.  If you are working with small children it is easier to let them decorate it before you put it on the doll.  It is hard sometimes to draw on a curved surface.


©2019 Cheryl Fillion