Friday, June 25, 2021

A Bit of Yoyo History

 With this pandemic, it has been hard for our quilt guild to get speakers to come to our meetings.  So we have been relying on our members to step in.  If you want to know the truth, I have actually enjoyed their talks and workshops more than well known quilt teachers and I am not just saying that because I will be the guild speaker in August.

To some members of my guild I am known as the Yoyo Queen. I have mentioned before in this blog that I love making and using yoyos.  So I am going to tell the guild a bit of history about yoyos and all the way I (and so they) can use them.  And I thought to practice a little, I might share my talk with you. 

Yoyo quilts tend to be controversial.  Why?   ‘Technically’ they are not quilts. They don’t have batting, they don’t have a backing and there are no layers that are quilted together.  But because they often cover a bed, they are usually found in discussion of quilts.


So instead they are known as coverlets. Ladies in the past would use them as a summer bedspread.  They would cover their beds with a top sheet and then put the yoyo quilt over the sheet.  With the sheet showing between the yoyos, it gave it a light, airy look and feel.  And usually at night they would fold up the yoyo quilt before going to bed so you didn’t really cover up with this type of quilt.

The technique of making yoyos came around the late 1800s also known as the Victorian age.  In England they were first thought to be made in the 1600s.  They became a fad in the 1920s to 1940s partly because they were easy to carry around and sew.

They have been known as rosettes, puffs (that is what they were called in England.  Suffolk Puffs to be exact after the county in which they were first thought to be made) and one source I read said they were also called Marguerites (don’t know why that name except that there is a daisy with that name and maybe the yoyo looked like the center of the daisy.).  Since they became popular in the 1920s when the toy yoyo became popular, it is thought that these fabric circles received the name Yoyo because they looked like the round toy.  We may actually never know about their name.

Most yoyo quilts were just like patchwork quilts one yoyo next to each other with no pattern or color scheme.  


But sometimes they resembled what we thought of as quilt designs.  They had ‘blocks’ of maybe 5 yoyos by 5 yoyos with a row of a solid you around it like a lattice strip. 


And I have seen some where the ‘block’ were put on point to give it a diamond look with the edges scalloped giving it a zigzag look.  So even if you don’t consider a yoyo quilt as a quilt, it can look like a quilt in its design.

©2021 Cheryl Fillion


Friday, June 11, 2021

Doll Hair Decisions


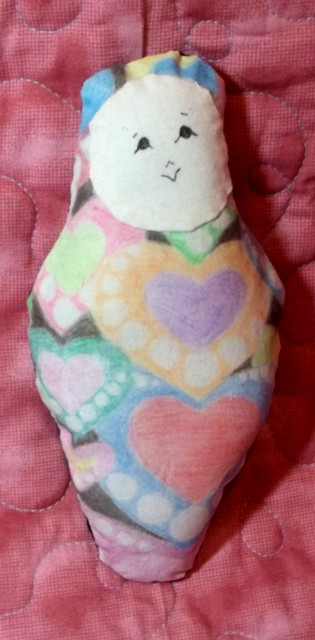
 I have an idea for my etsy shop of cloth nesting dolls.  Nesting dolls are those usually hollow wooden dolls where a smaller one ‘nests’ inside a little one.  Also known as Matryoshka dolls, they tend to be quite popular. I have already made some dolls similar which I called art dolls (a picture is below).


But I want to do some that look traditionally like the Russian nesting dolls.  Now these would be made of cloth not wood and they would not ‘nest’ inside each other. 

The one big difference in the face of the dolls pictured above and the one I want to make is that some hair will show on their face.  The big problem I have is how to quickly make the hair.  I would go to bed thinking of different ways to do the hair.

Do I applique some fabric to simulate hair, do I do some colored pencil or fabric market hair, or should I do a little embroidery for the hair?  There is a thought among quilts when deciding on fabric for borders, for example, which is to ‘audition‘ different border fabrics along your top.  Lay the top over the bolt of fabric and see which one looks the best.

So I decided to do that with different hair ideas.  I immediately eliminated the idea of appliqueing fabric for the hair.  The biggest face would be about 1 1/2 inches in diameter.  The idea of appliqueing something that small and then smaller for the medium and small dolls made me get a little panicky.  I am only average in my needle turn applique skills.

So for the other ideas of pencil, pen and embroidery, I drew out the biggest face on fabric, inked in the facial expression and then did the hair.  I did a different face for each pencil, pen and embroidery idea. 

The pencils were the first I tried.  I used two different browns.  (I also decided to do the faces in the same direction after I did the first one.).  I liked how it looked but am concerned about the textile medium I would use to make the pencil permanent.  If these dolls went to babies who might suck on them, the medium might be harmful. 


I then did the pigma pens. 
I had a fine point pen and a “brush” pen.  My fine point was running out of ink so I couldn’t make it real dark.  When I showed it to a friend she said it looked like strains of hair and she liked that.  This wouldn’t need textile medium to make it permanent.  It just had to be heat set with an iron.


Then I tried the embroidery.  I did a long and short stitch which covered the whole area.  I liked how that look.  I then did pencil over the whole area and then did a stem stitch.  It gave it a good look but I liked the long and short stitch better (which is why I didn’t finish the entire hair area). 


So I am going with the embroidery.  I think I will use some of the pen underneath so if the dolls are played with a lot and the embroidery pulls out, it will still look like she has hair.

I am glad I auditioned the hair styles.  It gave me something to try and really see how it would look as opposed to imagining it in my head, or trying it on a completed doll.  So the next time you can’t make a decision, try auditioning your options.  It might make the decision easier for you.

©2021 Cheryl Fillion


Friday, May 28, 2021

I Make Dolls

I am in the mood to make dolls and when I read a blog I posted a couple of years ago, I became even more inspired.  I thought I would repost this for you to read.

I make dolls.  I have made dolls for over 30 years.  But I never really considered myself a doll maker until recently.  I usually made dolls to do other crafts. 

Since I am a fiber artist, most of the dolls I make are cloth dolls.  Cloth or rag dolls (often called that because they were made and stuffed with rags) have been around for thousands of years.  The earliest one knon is about 1700 years old.  It was found in a grave from Ancient Rome and was made of linen.  There are not many cloth dolls around because they were literally loved to pieces,

My doll making actually started with teddy bears.  I found a wonderful pattern and began making bears for gifts and for charity.  I gave dozens to homeless and abused women shelters for the children staying there

I then found a pattern for little felt bears.  Felt was wonderful to use because it doesn’t fray.  The fun part of these bears was you could dress them in various outfits.  I made a lot of these as gifts creating outfits to fit the recipients’ personality.


I think my first doll was from a fabric panel.  Panels often have all the parts of a doll or animal printed on the fabric including the instructions. You just cut them out and sew them up.  What I liked about this doll was more the embroidery than the doll.  At the time the doll was just to show off the embroidery I did.

 Even though I had made a doll, I still didn’t consider myself a doll maker.  Then one Christmas break while visiting my mother in Wisconsin, she found a class at a local quilt shop that we could take.  Taking a class together was something we always wanted to do but usually by the time I would get to her house for the holidays, there weren’t any classes available. The class was to make an Angel doll.  Mom collected angels so this was perfect for her.


Then around 2000 I was reading a book on creativity and there was an exercise called the Creativity doll.  The idea was to create a doll that represented something you wanted in your life: love, marriage, increased income, etc.  Think of it as putting a wish into a 3 dimensional form.  I wanted to be more of a free spirit so I made the doll following a pattern but her outfit was designed as I went along.


 I then began reading up on dolls: creativity dolls, healing dolls, dolls children could make and began to make more and more dolls  I finally called myself a doll maker  But still my dolls represent different types of fiber techniques.

I have made a doll using colored pencil on fabric.  


I have made woven dolls.  This was actually a challenge from my Fiber Artist group.  We had to create something using the bead and the fiber I used as the hair.  The sequins were actually part of the yarn.

 I have done dolls in punchneedle embroidery.


And my latest was the embellished doll I did during my birthday creativity retreat last year.


Dolls remind me of my childhood and all the play involved with dolls.  I still feel I am playing when I make dolls.  But doll making also inspires my creativity and imagination. It’s a challenge to see what type of artistic technique I can use with a doll and that then leads me to use that technique elsewhere.

You don’t have to consider yourself a doll maker to create a doll.  I didn’t for a long time. But some time when you are stuck for what to create or you just want to play try making a doll.  And, hey guys, no one says you can’t make dolls.

©2018, 2021- Cheryl E. Fillion