In September of 2018, our local quilt guild invited an Art
Quilt artist and instructor to come and do a lecture and class for the
guild. That artist name was Deborah
Boschert. I don’t consider myself an art quilt type quilter; I lean
more toward a traditional looking quilt.
But this artist uses a lot of embroidery in her quilts and that appealed
to me so I signed up.
I also bought her book – Art Quilt Collage (C&T
Publishing, 2016) ahead of time, which I rarely do with classes and had it read
3 times before the class took place.
Other than embroidery stitches, Deborah uses paint on her quilts. The first time I read the book, I thought, no
that is not for me. The second time I
read the book, I was thinking “Hmmmm that is interesting.” and while reading
the book for a third time I found myself at a craft store looking at paints.
Now the paint Deborah uses often is just regular acrylic
craft paint. No fancy fabric paint, just the kind of paint to use on wooden
crafts or ceramic knick knacks. Now if
you think, what I thought, “but wait that is not permanent and when you wash
the quilt it will come out”, you are right.
But these aren’t quilts that you cuddle in and possible wash if they get
dirty. These are art quilt. You hang them like pictures on a wall – no
washing involved.
So when my brother asked what I wanted for Christmas, I put
on the list acrylic paint and sponge brushes.
I have no idea if I will use paint a lot or even at all in my quilts but
I wanted to try something new. So below
is my adventure with paints and fabric.
 |
| aluminum tray |
I decided to work in the kitchen in case I needed water.
I covered the table with paper so I could get
as messy as I wanted and used a tin tray from some pastries to hold my paint
(like a palette).
 |
| fabric I used |
I just took a scrap of
fabric to begin with, nothing fancy or even very expensive or even, as you can
see, straight on all sides.
One design Deborah often uses on her quilts is a
circle. She didn’t buy a fancy stamp or
draw out the circle first and paint with a brush over the line (although she
could have), no she used the end of a toilet paper roll. Well, my recycling
heart loved that.
 |
| toilet paper rolls |
I started by pouring some paint in the aluminum tray. I didn’t even spread it around to even
it. I did that with the edge of the
paper tube.
 |
| paint on tray |
The next step was to dip the edge of the roll into the paint
and start stamping.
 |
| dip paper roll in paint |
 |
| start stamping |
And what is fun about the paper roll is you can squeeze it
in to all kind of shapes. Squeeze the
sides a little to make an oval shape.
 |
| Oval paper tube |
 |
| oval stamps |
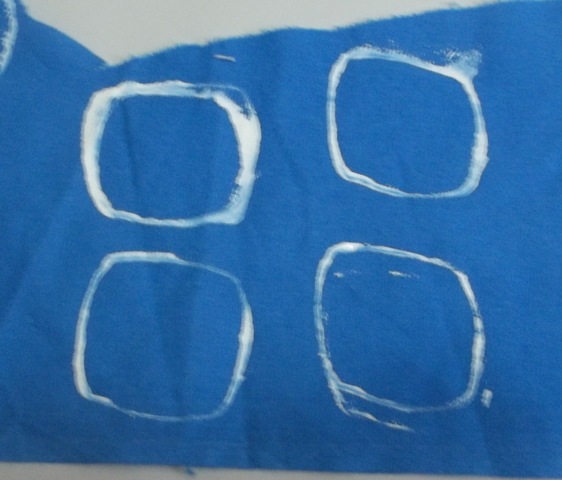
Flatten it down and then open it and flatten it
to make a crease on the other (un-creased side) and open it again, and you have
a square shape
 |
| flatten paper roll |
 |
| paper roll shaped into a square |
 |
| stamped squares |
And if you read any of my other experiment demos, I had to
make a heart (you just have to do that with a blog called Heartfully
Cheryl).
I squeezed it like the oval and
then on one side where it was creased I opened the edges and pushed the crease
inwards and just fiddled with it until it looked like a heart.
 |
| heart shape tube |
 |
| heart stamp |
Now to see the solid even amount of paint on your stamp you
have to dip it in the paint each time you stamp. If you dip it in the paint and then keep
stamping, the paint will lighten and become uneven. Some obsessive people might not like it but
as you can see the fading paint creates its own unique look.
 |
| circles with various amount of paint from paper roll |
One thing I did learn was to lift the stamp/paper roll off
the fabric straight up from the surface.
It you lean a little one way or another; you might get a little smudge
from the paint that has gone up the side of the paper roll. What surprised me about this is I actually
liked that look and I am usually one who wants things even all the way around
(no smudges).
 |
| smudges in top row of squares |
Now of course, you do want to let it dry thoroughly before
you use it for anything. I plan on
giving mine at least a couple of days to dry.
You might be asking “what are you going to do with that
fabric, Cheryl?” I have absolutely no
idea right now. But now I have some
fabric with new designs that can be added into a quilt as a background, or cut
it out into a shape like I would any other printed fabric. I will let you know when I do use it.
I have to say that was fun.
Almost like finger painting without the fingers. And it felt a little mischievous to be
purposely putting paint on fabric. It’s
not something you are taught to do as a quilter. So the next time you get the feeling of “nope,
that is not for me” consider actually doing it.
You might have some fun.
P.S. If you are
thinking about doing art quilts, definitely get Deborah’s book . Art Quilt
Collage. It takes you from inspiration
to finishing. And if you ever get to take a class with her, DO IT. She is a wonderful teacher and her class was
great fun.
©2019 Cheryl Fillion


No comments:
Post a Comment