Friday, April 19, 2024

Colored Pencil with Embroidery

 I wrote back earlier this month about using colored pencils on fabric. It is a very simple way to create a design on fabric. But you don’t have to use pencil alone.  Using a colored pencil is also a great way to enhance embroidery.

I am creating a sampler quilt with very bright colors. I decided that the alternate blocks would be embroidery.  But when I put the blocks together, the embroidery which was a simple outline embroidery (similar to Redwork) faded away.  There just was not enough of color to go with the bright pieced blocks.

I didn’t want to do the blocks over in appliqué or do another design so I got out my trusty pencils. Just like with coloring in a book, I colored within the embroidery lines.


After all the coloring is done, you then add the textile medium.  Painting the medium over the embroidery will make it stiff but with some use (like cuddling under the quilt) the embroidery will soften up. 

You might be able to do the coloring first and then add the embroidery but I am not sure what the textile medium will do to the embroidery transfer lines if you use the medium on it.  It is likely to make the transfer lines permanent just as it does the coloring.


Think about using your colored pencils the next time you want a little more color to your embroidery.


©2017, 2024  Cheryl Fillion


Friday, April 5, 2024

Colored Pencils on Fabric

 There is a lot of information out about using crayons on fabric. You color a picture on fabric with crayons.  Then you take that picture place it face down on paper and iron away the wax.  And you keep ironing until there is no more transfer of color to the paper (always use clean paper each time you iron).

But did you know you can also color on fabric with colored pencils and there is no ironing involved?  I do it often.  To me it is fun and relaxing and you can do all the things you did with crayon fabric pictures.  I will admit here that you do have to use a textile medium to make the color permanent on the fabric.  I’ll talk about that later in this blog.

You might be thinking what kind of colored pencils.  Any type you would find in the art area of a craft store or paper supply section of a discount store.  I have some I use that I got at a Dollar store.  Any brand will do.  The more expensive brands might have a darker pigment.  Watercolor pencils can also be used.  You use these the same way you use watercolor paints.

What fabric can you use? Cotton fabric works the best but a polyester cotton blend might work as well.  This is where you can play and see what fabrics are the best for what you want to do.  I do recommend using white or a light cream color.  If you use any other colored fabric, the color of the fabric will show through the pencil marks. 

Now what about this textile medium?  A textile medium is a liquid put on a painting that makes the painting permanent so if you wash it, the pigment will not come off or fade.  Often times it was put on oil or acrylic paintings so they would not fade if exposed to sunlight.  It is a little thicker than water and you brush it on the coloring and let it dry. This is more likely found in an art supply store or a craft store near the art supplies or glues.

The textile medium does make the fabric a little stiff but I found that once it is washed or the more you handle the picture (I did embroidery over one colored pencil picture), the fabric softens up.  If you don’t add the medium and the picture becomes wet or it needs to be washed, the picture will fade or disappear altogether.

Here is a sample I did for a class I taught.  The top heart is how it looks colored with just the pencil.  The bottom heart is how it looks after I submerged it in water but with no detergent.  My guess is with the detergent; all the color would be gone.


This picture is with the textile medium added.  Same colored pencil and the same fabric was used.  Again the top heart is just with the textile medium; the bottom after submerged in water.  There was just a slight change in color.


Some textile mediums say to heat set the picture after medium is put on.  That can be done with an iron. Ironing when using crayons removes the wax but also heat sets the pigment from the crayon. I was curious if that would have the same affect with colored pencil.  So I did another heart, ironed it and then submerged it in water.  Just ironing without the textile medium did not set the color. 


When I added the textile medium and also ironed I didn’t find that it changed the color at all after being in water.  So I wonder if the ironing is really necessary.  But then again as the old saying goes, “Better to be safe than sorry.”  Remember I haven’t used any detergent with these so maybe that might make a difference.


This is a technique you can use with children.  I would stabilize the fabric a bit with either iron on interfacing or stabilizer that you can remove (if you want) or iron freezer paper to the back of the fabric.  Freezer paper can be found in some groceries in the wax paper/aluminum foil aisle. Freezer paper has a shiny/waxy coating to one side so when wrapped around meat would protect the food from freezer burn while in the freezer.

For this purpose you want the shiny side of the paper down on the fabric, move a hot iron over the paper side and it will temporarily bond to the fabric.  It helps the fabric from moving around when you color on it.

Once you have colored your picture, added the medium and let it dry, you can use that picture in anything.  I have seen entire quilts done with this technique.  From a few feet away, the quilt looked appliquéd; it wasn’t until you got up close to see if was actually colored. 

If you have some colored pencils and fabric, give it a try.  Who knows what you will create.


©2017. 2024 Cheryl Fillion


Friday, March 22, 2024

Embroidery sampler – Part 3

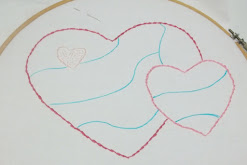
I finished the embroidery sampler.  I changed my original plan a bit.  Originally I was going to do all the stitching in the color of my logo.  So with the big heart, all the stitching would be done in the dark pink, and the lighter pink in the medium heart.  But I realized that all the stitching would just blend together so you couldn’t tell what stitches were what.  So having done the line or border stitches in one color, I did the individual stitches in between the lines in the color of the other heart shape.  I like it much better this way. 

I went through my embroidery books to look for some stitch ideas.  I found some I like using like the French knot and the fly stitch.  Then some I like but are challenging for me like the lazy daisy.  And then some new stitches I wanted to try. 

If you remember the little heart, I just did the seed stitch.  It wasn’t really big enough to do multiple stitches and the seed stitch is another stitch I like to use.


For the medium heart, I actually started with the French knot.  I like using the French knot.  It is one a lot of people have trouble with but it is just one of those stitches that you have to practice, practice, practice. 


One of those stitches I found in my embroidery book and thought would be fun to try.

It was the woven cross.  It starts off like a cross stitch but you repeat the same stitches weaving the last stitch in and out of the other stitches.


Another stitch I am seeing a lot lately in embroidery books but never tried is the sheaf stitch.    It is basically three straight stitches parallel to each other with a fourth stitch gathering the three stitches in the middle.  The do look like a sheaf of wheat.  This was a fun stitch to do.  I have seen it used a a filler but also used at the bottom of a flower right above the stem.


Now for the big heart I had a lot of room to fills so I did some combinations of stitches.  The fly stitch is one of my favorite.  It is a stitch like the start of feather stitch but instead of making another what I call ‘U’ stitch next to the first one, You just make a little straight stitch at the bottom to hold it in place.  So in one section I started with the fly stitch.


 But then one book had a variation I had to fill the rest of that section with.  You do the fly stitch but then add two more straight stitches on either side of the first one.  It gives it the appearance of a crown which is what this stitch is called.


I did something similar in another section.  Started one end with a lazy daisy stitch which is really just one link of the chain stitch (and this stitch is also know as the link stitch). 


Then on the other side I did a picot stitch (or lazy daisy with  a long tail stitch).


But then one book had a variation of the picot stitch called the tulip stitch.  You do the picot stitch but on one side of the ‘chain’ you take a stitch and bring it under the anchor stitch to the other side of the ‘chain’.  It gives it the appearance of leaves.  It was a fun stitch to try.


I did a simple star stitch around the little heart.  I thought it helped frame the little heart in the very light pink.


At the bottom of the big heart I did the pistil stitch which is really just a French knot with a long tail.  It is great to add to a flower design in any embroidery.  I thought it was a good match to the French knots that are at the bottom of the medium heart.


And then finally I did the one stitch I always wanted to try.  It is called the woven spider web.  You take any odd number of straight stitches embroidered like the spokes of a bicycle wheel and with an alternating color you weave the second thread in and out of the spokes.  You don’t want to pull the weaving too tight or the stitches tend to hide under each other.  I liked how it turned out but I think it is better with a thicker embroidery thread than the floss I used. It looks a bit like a flower so I am going to have to try that one again.


This was fun, trying new stitches and deciding where and how to display them.  Now I just have to figure out what to do with my little Heartfully Cheryl logo.  Do I frame it or make it into a quilt wall hanging (which is usually what happens with my embroidery.


© 2019, 2024- Cheryl E. Fillion.


Friday, March 8, 2024

Embroidery Samplers - Part 2

 When I posted 2 weeks ago, I had the outline of my heart logo done in the stem stitch and the tiny heart ‘filled in” with a seed stitch.  Now since I was creating a sampler (of sorts), I decided I needed more line or outline stitches displayed.

So I randomly drew some curved lines through each of the bigger hearts.  I thought curved lines would be more interesting to look at and a little more challenging to stitch. (I tend to use the disappearing markers when marking my embroidery, especially on light colored fabric. )


Now I needed to decide on the stitches.  This is always my most difficult decision to make when working on an embroidery piece of my own.  I want to use them all but usually end up going with the back stitch since that is the one I can do without much concentration.  I usually embroidery when I just need to relax and not think too hard.  So my first decision was not to use the back stitch. 

I opened one of my embroidery books and just started looking at stitches.  (Just a note, this won’t be a tutorial on stitching as teaching embroidery is not one of my strong point.  If you search the internet, you can find picture and video tutorials that do a much better job than I could ever do.  Trust me on this.)

The first stitch I did was called the cable stitch also known as the alternating stem stitch.  That is what it really is.  Where the stem stitch is taking a stitch on top of the previous one, this stitch alternates one stitch on top, the next below.   (You will find if you are just beginning embroidery that many stitches have a number of names.  It can be confusing at times.  For example, the stem stitch which I used to outline the hearts is also called the outline stitch or the crewel stitch.)


I then used the fern stitch (or fern leaf stitch).  I liked how it looked in my book but on the heart it looks a bit like the stitching of a baseball. 


The next stitch is a fun one because it uses two different colors, the whipped running stitch.  The running stitch is the most basic stitch for embroidery or any kind of sewing really.  What makes this one different is that a second thread is “woven” underneath the running stitch.  Gives it a bit of pizzazz to a very basic stitch.


The last line stitch in the dark pink is the chain stitch.  This is another stitch, like the stem stitch, that I like but sometimes have trouble with.  I can’t always get the ‘chains’ to be the same size.  But it is a great stitch.


I only did two outline stitches in the medium pink heart.  It really wasn’t that big to do much more.  I picked another favorite, the feather stitch (also known as the Briar stitch).

When I was stitching it, it reminded me of an open sort of alternating chain stitch.  It gives a fancy look.


And I saved my favorite stitch for last.  I learned it as the Twilling stitch but it is also known as the Double knot stitch, the Old English knot stitch or the Palestrina stitch.  It is a outline stitch made of a fancy type knot.  It is a little difficult but gives such a great outline look especially when done with a thick thread.  And it will impress those who don’t know much about embroidery.  I used it in a quilt once and overheard some ladies at a quilt show where my quilt was displayed, talk about how impressed they were that I made so many French knots.  They were impressed.


So those are the line designs of my Heartfully Cheryl logo.  Next week I will add some filler stitches in between the lines.


©2019, 2024 Cheryl E. Fillion


Friday, February 23, 2024

Embroidery Samplers


I have been doing embroidery since I was about 9 years old.  It is always my go-to needlework when I am traveling or just want to relax.  But the one thing I have never done is an embroidery sampler.

Embroidery samplers were a type of needlework young girls did back in the 1700 and 1800s to show off the needlework skills.  Remember there were no machines back then, so girls and women had to know how to sew to provide clothes and bedding for their family.

The samplers usually had the alphabet, occasionally a bible verse, some flowers, people or animals stitched on it. Often times different stitches were used to create the design but much of the time it was just cross stitched.  If you ever find a finished sampler, you have a prize, especially if the creator put their name and date it was made on it.

Samplers seemed boring to me which is why I never did any.  But lately I have wanted to make a sampler of sorts.  Not the kind I just described but some picture to show off different stitches.  You can still find sampler designs that are printed on fabric in shops or on line (that was another thing, the designs of samplers from long ago were not printed on fabric, the young girls and women created the design from scratch).  But I wanted to create one uniquely my own.

So I started looking for ideas.  I found one sampler set up to look like a color wheel with different stitches in different colors in concentric circles.  I found another one as a quilt with 4 inch blocks each holding a different stitch.   I liked the color wheel idea but it just wasn’t what I was looking for.  And I certainly didn’t need another quilt.

So looking around the room to get some ideas, I then saw my logo at the top of this page.  I would make a sampler with the Heartfully Cheryl 3 heart logo.  I even decided to do the stitching just in the pink colors of the logo (well, except for the tiny heart which is white in the logo.  If I put this on white fabric I didn’t think I would be able to see any stitching with white thread so I am using a very light pink).

I first enlarged the logo and traced it on a piece of white cotton.


 And then I did the outline of each heart in a stem stitch.  That was my first challenge since the stem stitch is one stitch I always have trouble with.  It never looked very stem-y but almost like a lopsided one sided cross stitch.  But this time the embroidery fairies were with me and I think the stitch turned out pretty nice.


I decided to do just one stitch in the little heart.  Even on this enlarged version of the logo it is only 1 ¼ inches wide.  So I used a wonderful filler stitch called the seed stitch.  It is just little straight stitches randomly put all over the design in various directions.  It is easy to do and does fill up an area rather quickly and nicely.  If you haven’t tried it, do so sometime.


I am still in the process of stitching it so I will post some more next week.  


©  2019, 2024- Cheryl E. Fillion


Friday, February 9, 2024

The Bucket List – Plan it

  So you have decided to do one item off your Bucket List.  Great, this is when the fun begins.

A great way to plan it is to imagine your perfect Bucket List item.  What do you need for your item to be perfect?  Where would it be? Who would be with you?  When would you do it? If it is appropriate, what would the food be?  Imagine every detail about your Bucket List item.

In another blog post I mentioned wanting to go to Door County, Wisconsin.  For it to be perfect for me; I wanted to rent a cottage by the water and in a town with a quilt shop I could visit.  At that time, this was the village of Sister Bay, Wisconsin. 

Now when do you want to do your item?  People work better if they have a deadline.  Deadlines help with plans.  You need deadlines to make any arrangements, secure any reservations, etc.. Remember none of these plans are set in stone.  You can change anything and everything.  

The next step is to get support.  This was most important to me. Tell people about your Bucket List item.  They may be able to help with ideas, with contacts, with finances and most important, enthusiasm.  People want others to succeed and you will be surprised how excited they will be for your Bucket List.

For me my support group helped me with raising money for my trip.  At the time I was working at a quilt shop that did machine quilting.  Many people brought me quilts to do and asked that the money go to my trip. When I could, I honored their request.  Two friends in Wisconsin were my chauffer and tour guide since they had both lived in Door County.  And many friends gave me ideas.  Since I was renting a cottage, I had to bring my own sheets.  The bed in the cottage was king size.  Since I only had a full size bed, friends lent me sheets to take.

No matter what your Bucket item is, you will probably need money for it.  So how much do you need.  Is travel and lodging involved?  Do you need lessons for your item?  Do you need ingredients or supplies?  Remember to think outside the box.  What else are you going to need? 

For me, I would be traveling during a time I usually taught a summer session at the college. So I not only needed money for travel, lodging, food, and souvenirs but I needed money to pay the bills since I was losing the teaching income while taking this trip.  Will that be a similar situation for you? 

What else do you need to complete your bucket item?  If you are going to skydive, do you need lessons?  If your item is running a marathon, how do you start your training?

If you want to try a new recipe, where do you get your ingredients?  Make sure you set this in motion.  The earlier you prepare for your item, the better your item will be.

All these things will help your bucket item become the perfect one you imagine.  And as you plan out your Bucket List adventure, you are actually making the item become a reality.  Part of the fun is in the planning.

Now get on with your Bucketing.


©2017, 2024 – Cheryl Fillion    

Friday, January 26, 2024

The Bucket List - Don't Wait

 How many of you have a bucket list?  If you have a list, have you done any of them?  You hear of people who when they find they have a terminal disease start to do some of the seemingly crazy things they have always wanted to do.

But why wait until you have been diagnosed with a disease or after you have retired. Why not start doing some of your bucket list now.

Now you may think that a bucket list is for the end of your life.  Oh really, who says so?  You van enjoy the items off your list at any time.   Yeah like right now. 

Let’s say you want to travel somewhere but you know it will be years before you can do it.  Why wait?  One item on my list was to spend time in a resort area of my home state of Wisconsin called Door County.  It was going to take me a while to save the money to take the trip but I didn’t want to wait to enjoy it.  

So I got on the internet and looked up things to do in Door County.  Of course I had to make sure there was a quilt shop there.  I found a webcam in a couple of the towns and watched them for months on end.  I learned about events and the weather and the busy times.  Doing this helped me keep my enthusiasm up while I saved up the money. 

You can do the same thing for whatever you want to do.  Find websites about your bucket list item.  Read books about it.  Find people who might have gone or done what you are planning.  They may have great tips on what to and not to do.

You can actually start enjoying your Bucket list item before you actually do your bucket list item. Don’t wait until the end of your life.


© 2016,  2024  Cheryl Fillion


Saturday, January 13, 2024

The Bucket List

 How many of you have a bucket list?  You know that list of things you want to do before you kick the bucket. If you have a list, that’s great. Start doing some of the things on your list.  If you don’t have a list, what is it you want to do in your life before you die?

You hear of many people who go sky diving or bungee jumping.  But what if that is not your style, what do you want to do?  Do you want to travel?  See the Grand Canyon? The Eiffel Tower?  Do you want to learn something new?  Not all of your bucket list needs to be WILD adventures; some can be MILD adventures like learning to bake bread.

I didn’t call my list a bucket list.  It was known more as a “Some day I’d like to” list.  And not everything on my list is an adventure or even expensive.  I want to learn to bake bread.  I’d really like to finish all the quilts I have started (and maybe some quilts I am thinking of starting).  I would love to read all the books I presently own. And yeah, I would love to travel.

Maybe as a New Year’s Resolution, you could start planning your bucket list. Think of the things you would like to do in your life.  One might be going to New York City for New Year’s Eve.   What is it you would like to learn?  A new language, a new art style, a new craft?  What is it you want  to do?

As I mentioned before, where would you like to travel?  It doesn’t have to be to another country.  Have you seen everything to see in your city?  Have you participated in some local event you have always been interested in?  The college where I work does the Nutcracker Ballet every December.  I love that ballet but in the 28 years I have worked there, I had only gone once until this year.  I had so much fun I think now it will be an annual event. 

If you can’t think of anything for your list, ask family and friends what you might have mentioned to them about wanting to do.  You might not remember but they will.  Or think back to what you liked to do as a child.  Did you sing into a hairbrush?  How about taking singing lessons or join a choir?  Did you wear out box after box of crayons but never took art lessons?  Take some art lessons.  Your local college might offer continuing education classes or a craft store might have a class or two.  Do you like the symphony; buy a ticket.

Your bucket list doesn’t have to be a stable list.  You can change the items as you go through life.  You can add or subtract things as your interests change.   But do make a list.  It is a great way to make sure your life is enjoyable and has meaning. And if you are like me, you will be able to make a great loaf of bread.


© 2016, 2024  Cheryl Fillion