Friday, November 17, 2017

A Heart Shape Needlefelted Bowl

How many of you remember the coiled clay bowls you made in art class as a child?  I bet you gave one to your mom for Mother’s day.  Well you can do a similar type bowl with needle felting.  It is my favorite way to make a bowl.  And to make it even more fun I do them in a heart shaped cookie cutter.


You start the bowl like you would a needle felted cookie cutter ornament. This one is a 3 ½” heart. (See my blog on “Needle Felting in a Cookie Cutter”).  Put some roving or wool batting in a cookie cutter and start to needle felt the roving to the shape of the cutter.  This will be the bottom of the bowl.

After you have felted in the shape for a while, turn it over and felt on the other side.  This will make it stronger and more firm.  I like to take the shape out of the cutter and look at it in front of a light.  If you can see light coming through the roving then add a little more there and felt it in.  Once you have the bottom of the bowl at the firmness you want felt around the edge of the shape to smooth it out.

roving in cutter

felting roving


felting edge of bottom


Now it is time to build the bowl.   Take some of the roving and roll it between your fingers to make a coil.  Lay it on top of the shape right along the edge and start felting it in.  It might be easy to start with small pieces and just add as you go along.  Don’t flatten it out; remember this is the wall of your bowl. in fact I often pinch the coils as I am felting it to make it stand up and not flatten out (just don’t poke your fingers).

coil of roving
starting the wall of the bowl


pinching edge to keep it from flattening
felting all around the edge


Once you have roving coiled all along the edge, start with another layer.  Gradually build up the wall by adding roving coils and felt it in.  You can as you go along smooth out the sides by felting the outside and inside of the walls.  When it is as high as you want, stop adding coils.  Smooth out the walls again checking it against a light source so you can see where there is a weak spot and then add roving there.


felting the side
felting the inside of bowl walls


I usually use simple smooth shapes like circles and hearts.  I haven’t had any luck with shapes like a star or multi-petaled flower.  But it might be different for you, so try it if you would like.

side view of finished bowl
top view of finished bowl


Occasionally I add beads at the top edge of the bowl just to add some sparkle.  I like the clear glass beads.  It doesn’t distract from the color of the wool and gives a little light to the bowl.  I either sew them on with invisible (or mono filament) thread or with thread that matches the color of the roving so it blends in.  If I am not able to pull the knot into the felted roving, I just add a tiny bit of roving on the thread knot and felt it in to hide the knot.

bowl with beads


© 2017  Cheryl Fillion


Friday, November 10, 2017

Cookie Cutters Aren’t Just For Cookies


I wrote this last year and just love the idea of using cookie cutters for crafts; I had to post it again.


Cookie cutters used to be for Christmas but now there are cutters for every holiday or occasion you can imagine.  But you know you can use cookie cutters for more than just cookies.  They are great shapes for kids crafts, appliqué, needle felting, punch needle and embroidery.


Pompom pumpkin


I use pumpkin, bell and stars for kid’s crafts at the market.  I trace the cookie cutter on to paper, scan them on my printer so I can enlarge them to the size I need (although I have pumpkin cutters in just the size I needed).   I print them out on cardstock, cut them out and punch a hole in the top then add yarn for a hanger.  Give them to the kids to glue whatever they want on it or just color them.  I was given pompoms of various colors so we have been using those. 


Cat Pumpkin
Witch Pumpkin


I have also used them for appliqué.  Again just trace the cookie cutter; cut it out on fabric and sew it down.  I like the cat and witch cutters my mom had as we were growing up.  They were great appliqués for my Halloween quilt (which one of these years I will finish).

Punchneedle


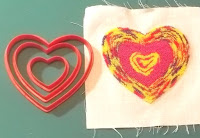
I enjoy punchneedle embroidery.  Recently I found some tie-dyed embroidery floss and wanted to see how it would look stitched out.  So I took several sizes of my heart shaped cookie cutters and made myself a little heart ornament using the floss.

 
Needlefelted

Cookie cutters are also a great shape for needle felting.  As long as the cutter is open on both ends, you can place your roving in the cutter and needle felt until the roving takes the shape of the cutter.  Then once you have finished felting it, you can use it as an appliqué, stick a thread hanger through it for an ornament or glue a magnet on the back and put it on your refrigerator. 


Making sugar cookies are so much fun and decorating them with children creates memories but using your cutter with fabric and thread (or glue and pompoms) is a way to keep the cookies forever.  Cookie cutters aren’t just for cookies anymore.


© 2016, 2017 Cheryl Fillion


Friday, November 3, 2017

Love Many Things


I journal.  I usually have my journal with me everywhere.  Even sometimes to bed.  This way if I need to get down an idea or an emotion, it is right there for me to get it all out.  I try to find journals with interesting covers so I can always look at something inspiring.

My latest journal has inspirational quotes and phrases on the cover.  The one I like the best reads: “Fall in love with as many things as possible”. When I read that I immediately thought of my needlework.  I like doing so many different things and usually have one or two or twenty different projects going on at once.   

I usually get inspired to start a new pattern or design and am too impatient to finish the project I am working on before I start the new one.  I eventually finish my projects.  It might take years but they do get finished. 

 But sometimes the fact that I do so many different types of needle work bothers the people around me.  “Do you do everything?” they ask.  No.  I never got the hang of crocheting, knitting, or tatting.  But still they want me to concentrate on one thing.  Why when there are so many things out there to try?

I like doing different things.  It gives me variety.  I think I would be bored if I did just one thing all the time.  If I do my needle felting for a while and need a change of pace I try a little embroidery or appliqué.  Then after a while I can do the needle felting again.  It is like I have given myself a little vacation and now I am refreshed.

Often one form of needle work gives me a new idea for another needle work I do.  Recently the embroidery I have been doing has inspired me to try embroidery on my needle felting.  I am working on some felted hearts with little flowers embroidered on them.  (I’ll post a picture when I get them done.)

I have also noticed that if I keep switching needlework, my hands or arms don’t get sore.  With needle felting there is the repetitive motion of up and down of the needle into the wool roving or batting but if I do some hand quilting my hand is making a different motion.  So it helps flex different muscles.

And with some things I have to concentrate and with others I can just do it automatically.  So if I am with some friends or watching TV. I can spoolknit or needle felt but if I need to have some quiet, hand quilting or weaving is better for that.

It is OK to like to do different things.  And it is also OK if you like doing just one type of needlework or art.   As another quote on my journal cover says, “Do What You Love”.


©2017  Cheryl Fillion