Friday, October 28, 2016

Yoyos (no, not the toy)

I have two problems.  One, I like fabric.  I make my own clothes, quilts, dolls, pillows and ornaments. I like the feel of fabric and the color and design of fabrics.  All kinds of fabrics - cotton, fleece, satin, wool - tickle my fancy.

My second problem is that my grandmother was a reuser (if that is even a word) and recycler before those terms were officially part of our vocabulary.  She would save to use anything she could.  I remember a big ball of string that had pieces as small as 3” and as large as a couple of feet. Remember when frozen dinners came in aluminum trays with aluminum foil on top.  She saved those pieces of foil to reuse somewhere else  

So what do those two ‘problems’ have to do with each other?  I use every bit of fabric I can, even the smallest of pieces.  My favorite way to use small pieces is by making fabric yoyos.

Now I am not talking about the toy on a string that many people (not I) can make do all kinds of tricks. I am talking about circles of fabric that is sewn around the edge and gathered together to form a little rosette.  Yoyos became popular during the Victorian age, around the late 1800s.  But they became a fad between 1920-1940, because they were easy for women to carry around and do anywhere.  They still today are popular for that same reason.


Depending on the size of the yoyo, they can be used to make all kinds of things.  In the 1920s, bed coverlets were a popular thing to make with yoyos.  I haven’t been that ambitious with my yoyos.

 As well as…
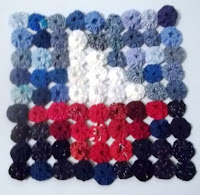


  table mats


   ornaments


or fabric pins.

Next week I’ll have a tutorial on how to make yoyos.

Here’s a couple of yoyo items from my etsy shop


Friday, October 21, 2016

Spool Knitting: Threads and Knitters

Spool knitting will look different depending on the size of the thread and the size of the spool knitter. You need to take that into consideration when you plan to work on a project.  I found this out when I used crochet thread in my spool knitter hoping for a tight cord but instead I ended up with a loosely knitted one.

To me the size of the spool knitter is the distance between two pegs.  I have one that has pegs about ¼” apart which makes very thin cords and I have another one (which I use most often) where the pegs are about ½” apart.

So I tried an experiment for this blog.  I used the same yarn or perle cotton on both spool knitters knitting about 6 inches.  And here is the difference I found.

In the first picture the cords are knitted with the ¼” pegged knitter.  The blue is 4 ply acrylic yarn (you will recognize the cord from my blog post ‘Spool Knitting Tutorial’). The red-orange cord is done with perle cotton #5.  And the white is done with perle cotton #10.
1/4" pegged knitter coils

In the second picture, the cords are knitted with the ½” pegged knitter. The same yarn and perle cotton was used.  Because these pegs are farther apart the knitting stitches are bigger.  And the thinner thread is even looser in the knitting.


1/2" pegged spool knitter


Depending on the look you want with a knitted cord, you might want a thin thread. Knitting with the ¼ inch knitter give the cord a more delicate look.  But with the 1/2” knitter, the knitting doesn’t seem to hold its shape very well (at least to me.)  What do you think?


©2016  Cheryl Fillion

Heartfully Cheryl Etsy Shop:

Friday, October 14, 2016

The Law of Attraction

Have you ever had a time when suddenly everything you read or heard was about a particular idea?  I am not talking about when you become interested in a subject and seek out information about it.  I mean those times when you pick up a book or turn on the television and there is that particular idea.  Psychologist Carl Jung called this synchronicity.

The idea that has appeared before me in one way or another in the last couple of weeks is what is known as the Law of Attraction.  This is the idea that what you think, feel or create brings to you more of what you think, feel, or create. If you think about flowers, more flowers will appear in your life.  If you think about kindness, more kindness will appear.  It also works with negative ideas but we don’t want to think negative right now.

With that in mind, I find myself wanting to create beautiful quilts and dolls and poetry.  The energy of those beautiful things will then go out into the world and hopefully come back to me. But in the process it will touch others who will then themselves create beautiful things. 

Right now when what you see and hear on television or in the newspaper is about war and crime and hate, take on the Law of Attraction and think, feel, or create those things you love.  The energy of  things you love will go out into the world in many ways and will then prompt others to create things they love and that energy will circle back to you.
© 2016 – Cheryl Fillion

Friday, October 7, 2016

Spool Knitted Pumpkin

I like decorating for all holidays (I go crazy over board at Christmas) but for some reason I really like putting out pumpkins and Jack O’Lanterns for Halloween and Thanksgiving.
Since I have been talking about spool knitting in this blog, I decided I needed a new pumpkin decoration.  This also give me a chance to show how to change colors while spool knitting.

So I pulled out my bigger spool knitter and started knitting with green yarn for the stem of the pumpkin. Now I could finish off the knitting (as described in the blog post ‘Spool Knitting Tutorial’) and then later sewn it to the orange cording for the pumpkin body. But I wanted a continuous cord for this ornament. 


Making the pumpkin stem

This means I have to change color while knitting.  It is easy to do.   When you have the amount of color cording you want ( I knitted about 1 ½ inches), cut the yarn coming from your skein about 3 inches.   Make sure the yarn doesn’t come off the pegs.  

Cut green yarn to add orange.


Lay your next color next to the yarn you just cut and tie the two colored yarn together with a simple over hand knot .  Now continue knitting as before. 

Lay colored yarns side by side. 


Knot the yarns together.


When the knot gets to the knitting, I usually take my knitting tool and push the knot into the center of the cord so it is hidden.


Knot knitted into the coil  
Knot hidden in coil.


When I think I have enough cord, I usually make whatever shape I am planning just to make sure I have knitted enough but I don’t sew it yet.  If I need to do a little more, I do.  I finish off the cord and remove it from the knitter.


Check the size of the shape before finishing cord.
To make my pumpkin, I start making a round shape starting with the end of the orange part of the cord. I fold the edge over maybe ¾” and start stitching at the fold.  I do use a pin to hold the fold together and once I have it stitched, I remove the pin.

Starting the shape.

You can sew the cord together with the yarn you used or regular sewing thread that matches the color of the yarn.  For me the thread is easier to control and if it matches the color, it will blend in with the yarn. (For these pictures I am going to use a darker thread so you can see how I stitch it.) 

I don’t sew right along the edge but try to hide my stitches in the area between cords.  As I stitch I just keep rolling the cord in shape until I get a nice round shape.


Hide the stitches inside the shape. 

Make sure your needle goes through both sides of the area being sewn.  In other words catch with the needle the cord already sewn in the shape you are making and then in the cord being added to the shape.

Put needle through both sides of the sewing area.

Put needle through both sides of the sewing area.

 Continue sewing until you come to the end of the orange part of the knitted cord.  The green part I started with will be the stem of the pumpkin so that won’t be sewn down as with the orange.  This needs to stick up.  If for some reason the stem doesn’t stay up, you can sew a couple of tack stitches right at the base of the stem to stabilize it (right where the pin is.) But remember not all pumpkin stems are straight. J


The pin shows where to tack the stem so it is upright. 
                          
So here is our finished pumpkin.  It is about 5” wide by 5”  high (6 ½” if you include the stem.  It can be used as a coaster or just a table decoration or string some yarn though the stem and hang it from a Halloween tree (if you do that) or on the wall.


The finished pumpkin 

    ©2016 Cheryl Fillion                

Tuesday, October 4, 2016

October is Breast Cancer Awareness Month

October is Breast Cancer Awareness Month.  Honor a cancer survive and make a donation to your favorite cancer charity.


Here are some ribbon items in my shop.  Proceeds from the sale of these items goes to the American Cancer Society’s Relay for Life.  This is an event I participate in every year with friends and students. I am showing the pink felted ribbons here but I also have awareness ribbons in various colors