Friday, May 31, 2019

Embroidery sampler – Part 3


I finished the embroidery sampler.  I changed my original plan a bit.  Originally I was going to do all the stitching in the color of my logo.  So with the big heart, all the stitching would be done in the dark pink, and the lighter pink in the medium heart.  But I realized that all the stitching would just blend together so you couldn’t tell what stitches were what.  So having done the line or border stitches in one color, I did the individual stitches in between the lines in the color of the other heart shape.  I like it much better this way.

I went through my embroidery books to look for some stitch ideas.  I found some I like using like the French knot and the fly stitch.  Then some I like but are challenging for me like the lazy daisy.  And then some new stitches I wanted to try.

If you remember the little heart, I just did the seed stitch.  It wasn’t really big enough to do multiple stitches and the seed stitch is another stitch I like to use.
seed stitch
For the medium heart, I actually started with the French knot.  I like using the French knot.  It is one a lot of people have trouble with but it is just one of those stitches that you have to practice, practice, practice. 

French knots
 
One of those stitches I found in my embroidery book and thought would be fun to try. It was the woven cross.  It starts off like a cross stitch but you repeat the same stitches weaving the last stitch in and out of the other stitches.

woven cross
Another stitch I am seeing a lot lately in embroidery books but never tried is the sheaf stitch.    It is basically three straight stitches parallel to each other with a fourth stitch gathering the three stitches in the middle.  The do look like a sheaf of wheat.  This was a fun stitch to do.  I have seen it used a a filler but also used at the bottom of a flower right above the stem.

sheaf stitch
Now for the big heart I had a lot of room to fills so I did some combinations of stitches.  The fly stitch is one of my favorite.  It is a stitch like the start of feather stitch but instead of making another what I call ‘U’ stitch next to the first one, You just make a little straight stitch at the bottom to hold it in place.  So in one section I started with the fly stitch.

fly stitch

But then one book had a variation I had to fill the rest of that section with.  You do the fly stitch but then add two more straight stitches on either side of the first one.  It gives it the appearance of a crown which is what this stitch is called.


crown stitch
I did something similar in another section.  Started one end with a lazy daisy stitch which is really just one link of the chain stitch (and this stitch is also know as the link stitch). 

lazy daisy

Then on the other side I did a picot stitch (or lazy daisy with  a long tail stitch).

picot stitch
 But then one book had a variation of the picot stitch called the tulip stitch.  You do the picot stitch but on one side of the ‘chain’ you take a stitch and bring it under the anchor stitch to the other side of the ‘chain’.  It gives it the appearance of leaves.  It was a fun stitch to try.

tulip stitch
I did a simple star stitch around the little heart.  I thought it helped frame the little heart in the very light pink.

star stitch
At the bottom of the big heart I did the pistil stitch which is really just a French knot with a long tail.  It is great to add to a flower design in any embroidery.  I thought it was a good match to the French knots that are at the bottom of the medium heart.


pistil stitch
And then finally I did the one stitch I always wanted to try.  It is called the woven spider web.  You take any odd number of straign stitches embroidered like the spokes of a bicycle wheel and with an alternating color you weave the second thread in and out of the spokes.  You don’t want to pull the weaving too tight or the stitches tend to hide under each other.  I liked how it turned out but I think it is better with a thicker embroidery thread than the floss I used. It looks a bit like a flower so I am going to have to try that one again.

woven spider web
This was fun, trying new stitches and deciding where and how to display them.  Now I just have to figure out what to do with my little Heartfully Cheryl logo.  Do I frame it or make it into a quilt wall hanging (which is usually what happens with my embroidery.

 
finished embroidered logo

© 2019 – Cheryl E. Fillion.


Friday, May 24, 2019

Embroidery Sampler Part 2

When I posted last week, I had the outline of my heart logo done in the stem stitch and the tiny heart ‘filled in” with a seed stitch.  Now since I was creating a sampler (of sorts), I decided I needed more line or outline stitches displayed.

So I randomly drew some curved lines through each other the bigger hearts.  I thought curved lines would be more interesting to look at and a little more challenging to stitch. (I tend to use the disappearing markers when marking my embroidery, especially on light colored fabric. )


Line designs
Now I needed to decide on the stitches.  This is always my most difficult decision to make when working on an embroidery piece of my own.  I want to use them all but usually end up going with the back stitch since that is the one I can do without much concentration.  I usually embroidery when I just need to relax and not think too hard.  So my first decision was not to use the back stitch. 

I opened one of my embroidery books and just started looking at stitches.  (Just a note, this won’t be a tutorial on stitching as teaching embroidery is not one of my strong point.  If you search the internet, you can find picture and video tutorials that do a much better job than I could ever do.  Trust me on this.)


Cable Stitch
The first stitch I did was called the cable stitch also known as the alternating stem stitch.  That is what is really is.  Where the stem stitch is taking a stitch on top of the previous one, this stitch alternates one stitch on top, the next below.   (You will find if you are just beginning embroidery that many stitches have a number of names.  It can be confusing at times.  For example, the stem stitch which I used to outline the hearts is also called the outline stitch or the crewel stitch.)


I then used the fern stitch (or fern leaf stitch).  I liked how it looked in my book but on the heart it looks a bit like the stitching of a baseball. 
Fern stitch

The next stitch is a fun one because it uses two different colors, the whipped running stitch.  The running stitch is the most basic stitch for embroidery or any kind of sewing really.  What makes this one different is that a second thread is “woven” underneath the running stitch.  Gives it a bit of pizzazz to a very basic stitch.


Whipped Running Stitch
The last line stitch in the dark pink is the chain stitch.  This is another stitch, like the stem stitch, that I like but sometimes have trouble with.  I can’t always get the ‘chains’ to be the same size.  But it is a great stitch.
Chain stitch

I only did two outline stitches in the medium pink heart.  It really wasn’t that big to do much more.  I picked another favorite, the feather stitch (also known as the Briar stitch).  When I was stitching it, it reminded me of an open sort of alternating chain stitch.  It gives a fancy look.
Feather Stitch


And I saved my favorite stitch for last.  I learned it as the Twilling stitch but it is also known as the Double know stitch, the Old English knot stitch or the Palestrina stitch.  It is a outside stitch made of a fancy type knot.  It is a little difficult but gives such a great outline look especially when done with a thick thread.  And it will impress those who don’t know much about embroidery.  I used it in a quilt once and overheard some ladies at a quilt show where my quilt was displayed, talk about how impressed they were that I made so many French knots.  They were impressed.

Twilling stitch
So those are the line designs of my Heartfully Cheryl logo.  Next week I will add some filler stitches in between the lines.

Heartfully Cheryl Logo
©2019 Cheryl E. Fillion


Friday, May 17, 2019

Embroidery Samplers


I have been doing embroidery since I was about 9 years old.  It is always my go-to needlework when I am traveling or just want to relax.  But the one thing I have never done is an embroidery sampler.

Embroidery samplers were a type of needlework young girls did back in the 1700 and 1800s to show off the needlework skills.  Remember there were no machines back then, so girls and women had to know how to sew to provide clothes and bedding for their family.

The samplers usually had the alphabet, occasionally a bible verse, some flowers, people or animals stitched on it. Often times different stitches were used to create the design but much of the time it was just cross stitched.  If you ever find a finished sampler, you have a prize, especially if the creator put their name and date it was made on it.

Samplers seemed boring to me which is why I never did any.  But lately I have wanted to make a sampler of sorts.  Not the kind I just described but some picture to show off different stitches.  You can still find sampler designs that are printed on fabric in shops or on line (that was another thing, the designs of samplers from long ago were not printed on fabric, the young girls and women created the design from scratch).  But I wanted to create one uniquely my own.

So I started looking for ideas.  I found one sampler set up to look like a color wheel with different stitches in different colors in concentric circles.  I found another one as a quilt with 4 inch blocks each holding a different stitch.   I liked the color wheel idea but it just wasn’t what I was looking for.  And I certainly didn’t need another quilt.

So looking around the room to get some ideas, I then saw my logo at the top of this page.  I would make a sampler with the Heartfully Cheryl 3 heart logo.  I even decided to do the stitching just in the pink colors of the logo (well, except for the tiny heart which is white in the logo.  If I put this on white fabric I didn’t think I would be able to see any stitching with white thread so I am using a very light pink).

I first enlarged the logo and traced it on a piece of white cotton.
Design on cotton
And then I did the outline of each heart in a stem stitch.  That was my first challenge since the stem stitch is one stitch I always have trouble with.  It never looked very stem-y but almost like a lopsided one sided cross stitch.  But this time the embroidery fairies were with me and I think the stitch turned out pretty nice.
Embroidered outline
I decided to do just one stitch in the little heart.  Even on this enlarged version of the logo it is only 1 ¼ inches wide.  So I used a wonderful filler stitch called the seed stitch.  It is just little straight stitches randomly put all over the design in various directions.  It is easy to do and does fill up an area rather quickly and nicely.  If you haven’t tried it, do so sometime.


Small heart embroidered
I am still in the process of stitching it so I will post some more next week.  


©  2019- Cheryl E. Fillion


Friday, May 10, 2019

The Healing Power of No


The word no is probably the first word any child learns.  With that word they learn choice.  No, they don't want that toy. No, they don't want that spinach.  No, they don't want to go to bed.   The parent uses that word to keep the child safe.  No, you can't run into traffic.  No, you can’t play with matches.  No, you can't run with scissors.  As much as a person relished saying the word no as a child, they may find it difficult to say no as an adult.

When we say no, we run the risk of disappointing or hurting others.  They then in turn may reject us or be angry with us.  So to avoid hurting others and being rejected ourselves, we say yes - even to those things we don't want to do.  What actually happens is we give up our choices, and a little bit of our self-esteem diminishes. 

Being able to say no is a choice and actually saying no improves our health.  If we continue to say yes to habits that affect our health (saying yes to a smoke or a drink) or to roles that no longer fit us (a parent who continues to take care of adult children), it distracts us from our own life and from our creativity.   Saying no allows us to take a stand for what is important in our life

There will always be someone to whom saying no is considered an insult.  They will feel that in some way you have rejected them. You have in fact disappointed them. Remember that when doing what you need for yourself, it will require disappointing others.  But by saying no to them, you have shown them that in fact they also have the choice of yes and no and that they can follow their own path to a healthy life.

You can help yourself and others by making a list of what is important in your life, how you want to spend your time.  If you know where yes is needed in your life, it is easier to say no to others. 

Saying no is powerful.  It allows us a choice in our lives; we are able to take a stand for what we truly need.  And it keeps us safe, just as when we were children, from doing something that is harmful to our minds, bodies or spirits.

© 2019 – Cheryl Fillion


Friday, May 3, 2019

The Same but Different – Part 2

I wrote a while back about a quilting project I have been working on where I have the same pattern repeated but with a slightly different twist to each individual block.  I wanted to see if I could create the same embellishment design but using different techniques. 


The block is a simple 4 – 4inch half square triangle blocks next to an 8 inch half square triangle block.  Each block has gray fabric along with a solid color which pretty much uses the color wheel. 

Basic Block

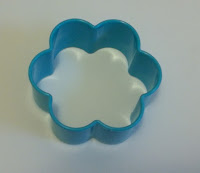
The embellishment design is a flower cookie cutter.  The first two blocks I finished were a couched fancy yarn and then an  spoolknitted cord.


Cookie Cutter
The next three were appliqué in different techniques.  My favorite appliqué technique is with the button hole stitch.   You draw your design on a fusible mesh (the paper side of course.  A fusible mesh is a layer of glue on a sheet of paper.).  Cut out the design and iron it on the wrong side of the fabric.  Cut out the fabric, peel off the paper and then iron that fabric on to a base fabric. 

Buttonhole Applique

So with this block I ironed the flower shaped mesh on the back of the green fabric, cut it out and ironed it on the red.  Then to secure it even more I embroidered a buttonhole stitch around the edge.  You can use other stitches as well. You can even use stitches from your machine to secure it down (that is not one of my skills).  By the way, it will stay on the base fabric without stitching it down if the quilted item is a wall hanging and not likely to be washed.  I used matching embroidery floss but you could use whatever color thread or floss you want.

Needle Turned Applique
The second appliqué block I did was using the needle turn appliqué.  This time you want to draw the design on the front of the fabric, cut it out with an 1/8 -1/4 seam allowance and as you stitch it down, turn (with the needle) the seam allowance underneath the appliqué piece.  

 I can teach a lot of techniques as you know from my tutorials, but in the case of appliqué and embroidery I am not very experienced.  Your best bet is to find some YouTube videos or take a class at your local quilt shop.

Needlefelted
The third block is only an appliqué of sorts.  I needle felted the flower with some of my fancier dyed wool batting and then tacked it or you could say appliquéd it down to the block.  I showed how to do this in my tutorial, Needle Felting in Cookie Cutters.

I like how this is turing out. Each technique gives a slightly different view of the flower shape.  So as I named it, it looks the same but different.  Hopefully soon I will have part 3 done

©2019 – Cheryl Fillion