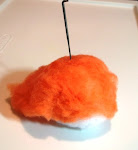
I am beginning to see pumpkins at the grocery and am also working on some needle felted pumpkins so I thought I would repost this earlier blog. Needle felted pumpkins are easy, fun and make great hostess gifts if you are invited somewhere for Thanksgiving.
Once you have the core batting, start felting it into the shape you want. If you use a polyester batting you may have to use more than the wool batting and may have to felt longer to get the shape you want. That’s OK because in most cases the polyester batting is cheaper.
When you have the
size and shape you want for your pumpkin, start felting in the colored
batting. The batting I am using in the
picture is called a sculptured batting so it has bumps and nobs of wool that
wasn’t combed smooth. I like the look of
it for the pumpkin. Not all pumpkins are
smooth in its shell. Keep adding the
colored roving or batting until your core sculpture is covered.
Once you have your shaped covered with the colored batting, pick one side and over felt it. That means keep needle felting the area until it is flat so you have a base to set it on. You don’t want your pumpkin rolling around.
One the opposite side of that base, needle felt a small indentation. This will be where your stem will go.
Once you have the size and shape of your stem, needle felt
it into the pumpkin. Place the stem in
the indentation and felt through the stem at the base and into the
pumpkin. Make sure you put your needle
all the way through to the pumpkin or the stem won’t attach.
Now most pumpkins have indentations along the outside. To create those, start needling in a line from the stem to the base and keep needling that same line until you see the indentation form. Do the same thing all around the pumpkin. I usually felt so there are eight indentations. But you do what you would like (including no indentations.)
Happy Pumpkin Season,
everyone.
©2017, 2021 Cheryl
Fillion


No comments:
Post a Comment