Friday, November 29, 2019

Mini Yoyo Tree Ornament


I am in the mood to make my mini yoyos.   And this time of year, my favorite thing to make with yoyos are little tree ornaments. 

They don’t take many yoyos – just 10 green and 1 brown one (brown yoyo is the trunk of the tree).  I like to use all different kinds of green colors and patterns but you could easily use the same green throughout the ornament.


To refresh yourself on how to make a yoyo go to my blog Fabric Yoyos: Tutorial.   For the ornament you need to have a yoyo about ¾” finished.  That size yoyo needs a fabric circle about 1 ¾” in diameter.

I start out the sewing by doing the green yoyos in rows.  And then I sew the rows together.


When you line up these yoyos, they will be off center from one row to the next.  You need to make sure you sew them together wherever they meet to the next yoyo.  When I go to sew the yoyos together, I try to find a thread that matches most of the colors or is a medium shade of the color.  You don’t want anything too light or too dark.  Your stitches will really stand out then and might take away from the yoyos (plus it will really show any wonky stitches you might have made.  After years of making yoyos, I still have some stitches that aren’t very pretty.)


Just continue to sew the rows together until all four rows form a triangle.  Then at the very bottom in the center of the row, sew the brown yoyo for the trunk of the tree.

At a thread to the top yoyo for a hanger and you have a yoyo tree Christmas ornament.


©2019 Cheryl Fillion


Friday, November 22, 2019

The Gift That Keeps on Giving


(I posted this a couple of years ago.  A friend reminded me that this is a good idea so I thought I would post it again.  Happy Holiday Gift Giving.)

Looking for a gift for someone?  Having a hard time finding the right thing?  How about giving them an activity instead?  What if you introduced them to a new craft or art form?

Giving crafts as gifts is the best way to create a lifelong memory.  My little spool knitting doll was given to me as a gift when I was a child.  I enjoyed it then and still do.  The first crewel embroidery I ever did was an embroidery kit.  The instructions, the yarn, the needle, printed fabric were all included in the kit.

Kits where everything is included (even any tools like needles) is the best way to start someone on a new creative adventure.  My love of needle felting came with a kit that included step by step picture instructions, the roving and the needle.  I don’t think I would have tried it if I had to find all the supplies separately.  Now I have gone crazy for needle felting.

If a kit isn’t available, why not sign them up for a class.  Many fabric and craft stores provide classes as well as libraries, community centers or non-profit organizations (YMCA, for example).  If there is something you can teach your gift recipient, buy them all the supplies they need to start lessons with you. This way they have their own tools and supplies.

Or give a gift card to a craft or hobby store, so they can choose their own craft.  And to add to your fun, go with them when they spend their gift.  It is another way you can share the experience.

Remember to start off small.  If they want to learn to quilt, start out with a pillow or small wall hanging.  You don’t want to buy all the supplies for a big quilt, only to find out that quilting wasn’t as enjoyable to your gift recipient and they get bored with it.

Not only is giving something crafty a great gift, it can lead to a lifetime of enjoyment. As the saying goes, it is a gift that will keep on giving. 

PS:  there is also nothing wrong with a brand new box of crayons for crafters of all ages.

 
©2016, 2019 – Cheryl Fillion

Friday, November 15, 2019

Quick Can Be Cute


I recently went to the Houston International Quilt show.  Our local Quilt Guild rents a bus and about 40 of us on a day adventure. This year our trip was on Halloween.

I like wearing holiday pins.  I have lots for Christmas  pins, a patchwork bunny for Easter, some flag related pins for patriotic holidays and in the summer I have a snowman pin that reads “Think Snow” to help with those 90 degree days.  I even have a Jack O’Lantern pin my mother gave me for Halloween.  I wanted to wear something Halloween related for the bus trip but I was afraid to wear that pin for fear I would lose it.

So the day before our tip, I decided to make a pumpkin pin. My thought was if I lost it I could always make another.  I didn’t have time to do any embroidery so I decided to use my fabric pens.

I quickly drew a free hand pumpkin on some muslin.  The pumpkin turned out to be pretty cute but the pin did not.  I was trying to cover a small slogan button pins that you find around election time.  I cut the fabric too small and it didn’t cover the pin very well. 

Ah but a new product is out that I love to use for necklaces.  It is these tiny embroidery hoops made to display embroidery pieces.  My pumpkin was perfect for it.

But now the chain to wear it as a necklace? I didn’t have a chain or rayon cording to use. What could I use?  I didn’t have time to go to a craft store.  I thought about yarn.  But then remembered a friend gave me some rickrack she no longer needed.  Rickrack, really?   And with luck there was brown rickrack which went great with the stained edges of the mini hoop. I but it with the hoop and it looked perfect.  Not how you would normally use rickrack but it worked.

So in a  ½ hour and trying some ideas I needed to do quickly, I have a finished necklace that I could wear on the trip to Houston and also every day since then.   With it just as a pumpkin, it worked for Halloween and for autumn or Thanksgiving (one holiday I did not have any jewelry for but do now).

Sometimes doing something on the spur of the moment and making it up as you go along works out just as well as a well planned idea.  Give it a try.  Quick can be cute.  


©2019 Cheryl Fillion


Friday, November 8, 2019

I went to the Houston Quilt show


Last year I took a trip with other quilt members to the Houston Quilt show.  It was so amazing, I went again this year.  I was not disappointed.

It is known as an international quilt show and that it is.  Quilts from all over the world are on display there.  You think of quilting as an American craft but it really isn’t.   I heard many different languages, saw different cities I had never heard of on the quilt description sheets and even bought some gifts from a vendor from New Zealand.

I was particularly struck by two things while at the show.  One was how friendly everyone was.  Now that really is not so unusual but I noticed that with the bond of quilting and fiber arts, quilters truly are friends who just haven’t met yet.  I got to know better some of the guild members I traveled with and carried on conversations with quilters from England, Canada and closer to home, Kansas.  We shared tips on the best quilts to check out, the best vendors to visit, as well as complaints as to how cold it was in Houston that day (it was unseasonably cold for this time of year.  And those traveling who expected Houston, Texas to be warm were very surprised.).

The other thing that struck me was the imagination and creativity that was on display.  Even with an exhibit that had a theme (like the show theme of blue and white quilts) no idea or pattern was duplicated.   I have had people tell me that quilting is old fashion, or on its way out as an art form or that you see the same thing over and over.  Just one look at the quilts in Houston or any quilt show really, and you see that that is not true.

As far as quilting being thought of as old fashion, I saw one quilt that from a distance looked like metal chain mail which I thought was unusual for a quilt show but on closer inspection I found it was layered and cut fabric.  The illusion was amazing (sorry due to copyright laws I can’t share any pictures of the quilts at the show.)  Another quilt had a bit of technology attached to it.  It looked like a landscape with the foreground made of light and dark colored triangles.  As you looked at it, the light colors changed from pinks and oranges to purple and blues.  The quilt was attached to a frame and there were lights behind the quilt that would change colors giving the different color changes to the light colored fabric.  I never would have thought to do that.

The idea that quilting is an art form that is on its way out of popularity or that you often see the same design is certainly not true when you see all the quilters who were at that show that day or even looking at all the quilts displayed.  You might not see your grandmother’s scrappy log cabin quilt but you will see a log cabin with the word LOOK inside two diamond designs all made of small log cabin blocks.  You might not see a summer coverlet made of my favorite yoyo pieces, but you will see a pixilated picture of a woman’s face made out of yoyos.  It is the quilts made of such detail that they look like photos but are actually pieced or appliquéd that make my jaw drop.

I told a woman I met there that I had been quilting since 1982 and yet coming to this show I feel like an amateur.  But that is the beauty of this quilt show and others shows, quilting has a place for everyone and there is always something new to explore and learn and create. And every quilt show you go to or every show and tell in a quilt meeting you get to see can inspire you to make something new or go in a different direction with your art.  If you ever get a chance to go to the International Quilt Show in Houston or anywhere, don’t pass that chance up.  You will not regret it.


©2019 Cheryl Fillion


Friday, November 1, 2019

Cookie Cutters Aren’t Just For Cookies


It is starting to be that time of year where we think of holiday goodies.  But I am one who does do much baking and yet I have dozens of cookie cutters.  You see you can use cookie cutters for more than just cookies.  They are great shapes for kid’s crafts, appliqué, needle felting, punch needle and embroidery.
'


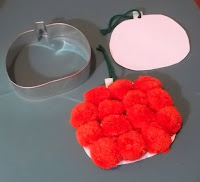
I use pumpkin, bell and stars for kid’s crafts at the market.  I trace the cookie cutter on to paper, scan them on my printer so I can enlarge them to the size I need (although I have pumpkin cutters in just the size I needed).   I print them out on cardstock, cut them out and punch a hole in the top then add yarn for a hanger.  Give them to the kids to glue whatever they want on it or just color them.  I was given pompoms of various colors so we have been using those.


I have also used them for appliqué.  Again just trace the cookie cutter; cut it out on fabric and sew it down.  I like the cat and witch cutters my mom had as we were growing up.  They were great appliqués for my Halloween quilt (which one of these years I will finish).


I enjoy punchneedle embroidery.  Recently I found some tie-dyed embroidery floss and wanted to see how it would look stitched out.  So I took several sizes of my heart shaped cookie cutters and made myself a little heart ornament using the floss.

Of course you can also use the shape for some simple red work (or any color) embroidery.  Again just trace the cutter (if desired, you can enlarge it as described above), get out your hoop, needle and embroidery thread, and stitch away.


Cookie cutters are also a great shape for needle felting which is my favorite way to do needlefelting. .  As long as the cutter is open on both ends, you can place your roving in the cutter and needle felt until the roving takes the shape of the cutter.  Then once you have finished felting it, you can use it as an appliqué, stick a thread hanger through it for an ornament or glue a magnet on the back and put it on your frieg.  (I’ll have a future blog concerning needle felting in a shape.)


Making sugar cookies are so much fun and decorating them with children creates memories but using your cutter with fabric and thread (or glue and pompoms) is a way to keep the cookies forever.  Cookie cutters aren’t just for cookies anymore.


© 2016, 2019 Cheryl Fillion