Friday, December 27, 2019

New Years Resolutions


How many of you make New Year’s Resolutions?  Is it to stop a bad habit or lose weight or exercise more?  Getting healthy sure is a good thing to do.

But what if your resolution was to be more creative?  What if you made a promise to yourself to do more art or sewing or learn a new craft? 

Every year I go through my unfinished quilting projects and decide which one I am going to finish for the upcoming quilt show in March.  It is amazing to me when I find I only have a little more to do on a project for it to be finished.

Other years I have promised myself to take advantage of the classes my quilt guild offers.  I have learned different ways to quilt on my home sewing machine, new ways to appliqué, new embroidery stitches (after a recent class with our guild I can now do a successful bullion stitch) and can now piece a Y-seam in a quilt block.

This coming year I want to try more embroidery techniques and learn to appliqué on my sewing machine and as always finish some of the projects I started this year.

Why not make sure you add some creativity to your resolutions list?  You can still break a bad habit, lose weight and exercise more but make sure you also create new art that represents who you are and what your 2018 brought to your life.

Happy 2020 to you.

Cheryl

©2017, 2019  Cheryl Fillion

Friday, December 20, 2019

Holiday Wishes


This is one of the most wonderful times of the year. There are the various holidays that sneak up at year’s end.  There is the changing of the seasons from autumn to winter which for some means snow and hot chocolate and for others might mean sunshine and lemonade.

So for what ever the end of the year means to you, I hope you are with family and friends, exchanging gifts and cards, involved in sledding or swimming and are having a wonderfully creative time.

Remember to involve all your senses in your holiday activities.  Not just listening to the laughter of your family or the carols heard on the radio, but also tasting new things with new recipes or new restaurants, smelling all the wonderful fragrances from the pine tree to the gingerbread men in the oven to the sights of holiday lights or country sunrises.  And don’t forget to touch, not just the gifts that someone has given you but the someone themselves.  Enjoy those hugs and kisses.

I hope all of you have a great holiday whatever and wherever you are celebrating it and you gather up all kinds of memories and ideas to last you a year of creating.

Happy Holidays (whatever holiday you celebrate).

Cheryl

©2016, 2019  Cheryl Fillion 


Friday, December 13, 2019

Traditions


Traditions are important.  They give you a sense of continuity.  You have a memory of something done in the past and an experience to look forward to in the future. They can give a sense of comfort and in many cases bring family and friends together. And they can give you time to reflect on what is important to you and others. And at this time of year, traditions seem especially meaningful.

Everyone has traditions where holidays are concerned.  I always have turkey and pumpkin pie for Thanksgiving. I watch the Macy’s Parade and the movie Holiday Inn with Bing Crosby.  To me the holiday wouldn’t be the same without those items.  At Christmas I decorate my house, even though I rarely have visitors.  I do it for me (or maybe I should say I overdo it for me).  There are certain movies I watch during the season and I usually have an Advent calendar to open up each day.  It gives the holiday more meaning to me and connects me to Christmas of the past and family who are no longer with me.

A lot of holiday traditions involve creativity.  Decorating the tree.  Making holiday cookies and candy.  Creating gifts for loved ones (I always remember the pajamas my grandmother used to make for my brothers, cousins and myself.)   Every year since I was a teenager I have made an ornament to give family and friends.  It was something I looked forward to and something others enjoy receiving.  Only one year did I skip the ornament making.  It was the year my mother died and that Christmas was difficult.  I didn’t think I would enjoy making the ornament knowing my mother wouldn’t receive one.  I regret not doing that now. I think it might have helped me with some continuity in a holiday that had changed so much without my mother.   

Many families have traditions that involve creativity.  I bet lots of you make Christmas cookies and candy each year.  You probably look forward to it and do it as a group. It gives you a chance to spend time with loved ones (especially if there are grandchildren involved) and share part of yourself as you serve the cookies at dinner or holiday parties.

You might have some holiday performance you attend.  For the past 3 years I have gone to the local performance of the Nutcracker that our Junior College puts on.  I look forward to it and make an evening out of it with a dinner to a favorite restaurant.  You might attend a church concert or even a city Christmas parade or a school pageant where your child or grandchild is performing. 

Traditions of any kind can be important to a person or a family.  They may bring you together once a year and allow you to connect with what is important.  And even if the tradition is just yours and you don’t share it with others, it gives you a chance to do something special and meaningful.  I usually go alone to the Nutcracker but it is something I end up sharing with others when I talk about it.  I feel good supporting the ballet in our area and showing all the young dancers how much I appreciate their work with my attendance and applause.  

Traditions have a way of creating memories every time you participate.  Think of all the memories you have as a child or of your children having a picture taken with Santa Claus or of going out to pick a Christmas tree or going caroling in your neighborhood.

And being able to participate in the same thing year after year gives a little predictability to our lives in this very unpredictable world.

Make sure you create some traditions for your holidays or for your every days as well.  It will show you and others what is important in your life and give you a chance to celebrate those special days.

©2019 Cheryl E. Fillion

Friday, December 6, 2019

Sign Your Work


One of the first things you learn as a quilter is to put a label on the back of your quilt.  It is a good idea if you are entering the quilt in a show.  This way the quilt will get back to you.  But it is also a good idea so those who receive your quilt know that you made it.  

Having a label or some identifying mark on a quilt has helped quilt historians to learn the history behind the quilt and the story of the quilter.  It helps to age the quilt.  And while it is hard to believe it now, your quilt will probably outlast you and wouldn’t you like people in the future to know who made it?

That is why artist sign their paintings and sculpture and it should be the same with any piece of art, even fiber art.  When young girls learn embroidery by doing a sampler, part of the design is putting their name or initials and year it was made in the stitching.  It identifies the sampler as theirs. 

This should be a practice that we all do.  You put a lot of time and energy in what you have made and others should know about it.  You don’t want someone else to take credit for your work.

If you can’t sign the actual work like a painter or sculptor, you can put a label on the back of your piece or stitch your name in the piece.  Some items might be hard to do like with jewelry.  Although if you make jewelry, you could add your initials to the back of some part of the jewelry piece. As I write this I wonder about my needle felting.  I guess I could make a little label to go on the bottom of the felted piece or maybe even felt my initials into the item.

Whatever type of art you do, it is important to give yourself credit for the art work.  Put your name on it by signing or making a label but do it.  Let others know that you created the piece and you are proud of it.  So whenever you complete a piece of art no matter what it is, make sureyou put your name on it.  

©2019 Cheryl Fillion


Friday, November 29, 2019

Mini Yoyo Tree Ornament


I am in the mood to make my mini yoyos.   And this time of year, my favorite thing to make with yoyos are little tree ornaments. 

They don’t take many yoyos – just 10 green and 1 brown one (brown yoyo is the trunk of the tree).  I like to use all different kinds of green colors and patterns but you could easily use the same green throughout the ornament.


To refresh yourself on how to make a yoyo go to my blog Fabric Yoyos: Tutorial.   For the ornament you need to have a yoyo about ¾” finished.  That size yoyo needs a fabric circle about 1 ¾” in diameter.

I start out the sewing by doing the green yoyos in rows.  And then I sew the rows together.


When you line up these yoyos, they will be off center from one row to the next.  You need to make sure you sew them together wherever they meet to the next yoyo.  When I go to sew the yoyos together, I try to find a thread that matches most of the colors or is a medium shade of the color.  You don’t want anything too light or too dark.  Your stitches will really stand out then and might take away from the yoyos (plus it will really show any wonky stitches you might have made.  After years of making yoyos, I still have some stitches that aren’t very pretty.)


Just continue to sew the rows together until all four rows form a triangle.  Then at the very bottom in the center of the row, sew the brown yoyo for the trunk of the tree.

At a thread to the top yoyo for a hanger and you have a yoyo tree Christmas ornament.


©2019 Cheryl Fillion


Friday, November 22, 2019

The Gift That Keeps on Giving


(I posted this a couple of years ago.  A friend reminded me that this is a good idea so I thought I would post it again.  Happy Holiday Gift Giving.)

Looking for a gift for someone?  Having a hard time finding the right thing?  How about giving them an activity instead?  What if you introduced them to a new craft or art form?

Giving crafts as gifts is the best way to create a lifelong memory.  My little spool knitting doll was given to me as a gift when I was a child.  I enjoyed it then and still do.  The first crewel embroidery I ever did was an embroidery kit.  The instructions, the yarn, the needle, printed fabric were all included in the kit.

Kits where everything is included (even any tools like needles) is the best way to start someone on a new creative adventure.  My love of needle felting came with a kit that included step by step picture instructions, the roving and the needle.  I don’t think I would have tried it if I had to find all the supplies separately.  Now I have gone crazy for needle felting.

If a kit isn’t available, why not sign them up for a class.  Many fabric and craft stores provide classes as well as libraries, community centers or non-profit organizations (YMCA, for example).  If there is something you can teach your gift recipient, buy them all the supplies they need to start lessons with you. This way they have their own tools and supplies.

Or give a gift card to a craft or hobby store, so they can choose their own craft.  And to add to your fun, go with them when they spend their gift.  It is another way you can share the experience.

Remember to start off small.  If they want to learn to quilt, start out with a pillow or small wall hanging.  You don’t want to buy all the supplies for a big quilt, only to find out that quilting wasn’t as enjoyable to your gift recipient and they get bored with it.

Not only is giving something crafty a great gift, it can lead to a lifetime of enjoyment. As the saying goes, it is a gift that will keep on giving. 

PS:  there is also nothing wrong with a brand new box of crayons for crafters of all ages.

 
©2016, 2019 – Cheryl Fillion

Friday, November 15, 2019

Quick Can Be Cute


I recently went to the Houston International Quilt show.  Our local Quilt Guild rents a bus and about 40 of us on a day adventure. This year our trip was on Halloween.

I like wearing holiday pins.  I have lots for Christmas  pins, a patchwork bunny for Easter, some flag related pins for patriotic holidays and in the summer I have a snowman pin that reads “Think Snow” to help with those 90 degree days.  I even have a Jack O’Lantern pin my mother gave me for Halloween.  I wanted to wear something Halloween related for the bus trip but I was afraid to wear that pin for fear I would lose it.

So the day before our tip, I decided to make a pumpkin pin. My thought was if I lost it I could always make another.  I didn’t have time to do any embroidery so I decided to use my fabric pens.

I quickly drew a free hand pumpkin on some muslin.  The pumpkin turned out to be pretty cute but the pin did not.  I was trying to cover a small slogan button pins that you find around election time.  I cut the fabric too small and it didn’t cover the pin very well. 

Ah but a new product is out that I love to use for necklaces.  It is these tiny embroidery hoops made to display embroidery pieces.  My pumpkin was perfect for it.

But now the chain to wear it as a necklace? I didn’t have a chain or rayon cording to use. What could I use?  I didn’t have time to go to a craft store.  I thought about yarn.  But then remembered a friend gave me some rickrack she no longer needed.  Rickrack, really?   And with luck there was brown rickrack which went great with the stained edges of the mini hoop. I but it with the hoop and it looked perfect.  Not how you would normally use rickrack but it worked.

So in a  ½ hour and trying some ideas I needed to do quickly, I have a finished necklace that I could wear on the trip to Houston and also every day since then.   With it just as a pumpkin, it worked for Halloween and for autumn or Thanksgiving (one holiday I did not have any jewelry for but do now).

Sometimes doing something on the spur of the moment and making it up as you go along works out just as well as a well planned idea.  Give it a try.  Quick can be cute.  


©2019 Cheryl Fillion


Friday, November 8, 2019

I went to the Houston Quilt show


Last year I took a trip with other quilt members to the Houston Quilt show.  It was so amazing, I went again this year.  I was not disappointed.

It is known as an international quilt show and that it is.  Quilts from all over the world are on display there.  You think of quilting as an American craft but it really isn’t.   I heard many different languages, saw different cities I had never heard of on the quilt description sheets and even bought some gifts from a vendor from New Zealand.

I was particularly struck by two things while at the show.  One was how friendly everyone was.  Now that really is not so unusual but I noticed that with the bond of quilting and fiber arts, quilters truly are friends who just haven’t met yet.  I got to know better some of the guild members I traveled with and carried on conversations with quilters from England, Canada and closer to home, Kansas.  We shared tips on the best quilts to check out, the best vendors to visit, as well as complaints as to how cold it was in Houston that day (it was unseasonably cold for this time of year.  And those traveling who expected Houston, Texas to be warm were very surprised.).

The other thing that struck me was the imagination and creativity that was on display.  Even with an exhibit that had a theme (like the show theme of blue and white quilts) no idea or pattern was duplicated.   I have had people tell me that quilting is old fashion, or on its way out as an art form or that you see the same thing over and over.  Just one look at the quilts in Houston or any quilt show really, and you see that that is not true.

As far as quilting being thought of as old fashion, I saw one quilt that from a distance looked like metal chain mail which I thought was unusual for a quilt show but on closer inspection I found it was layered and cut fabric.  The illusion was amazing (sorry due to copyright laws I can’t share any pictures of the quilts at the show.)  Another quilt had a bit of technology attached to it.  It looked like a landscape with the foreground made of light and dark colored triangles.  As you looked at it, the light colors changed from pinks and oranges to purple and blues.  The quilt was attached to a frame and there were lights behind the quilt that would change colors giving the different color changes to the light colored fabric.  I never would have thought to do that.

The idea that quilting is an art form that is on its way out of popularity or that you often see the same design is certainly not true when you see all the quilters who were at that show that day or even looking at all the quilts displayed.  You might not see your grandmother’s scrappy log cabin quilt but you will see a log cabin with the word LOOK inside two diamond designs all made of small log cabin blocks.  You might not see a summer coverlet made of my favorite yoyo pieces, but you will see a pixilated picture of a woman’s face made out of yoyos.  It is the quilts made of such detail that they look like photos but are actually pieced or appliquéd that make my jaw drop.

I told a woman I met there that I had been quilting since 1982 and yet coming to this show I feel like an amateur.  But that is the beauty of this quilt show and others shows, quilting has a place for everyone and there is always something new to explore and learn and create. And every quilt show you go to or every show and tell in a quilt meeting you get to see can inspire you to make something new or go in a different direction with your art.  If you ever get a chance to go to the International Quilt Show in Houston or anywhere, don’t pass that chance up.  You will not regret it.


©2019 Cheryl Fillion


Friday, November 1, 2019

Cookie Cutters Aren’t Just For Cookies


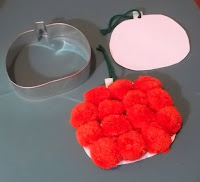
It is starting to be that time of year where we think of holiday goodies.  But I am one who does do much baking and yet I have dozens of cookie cutters.  You see you can use cookie cutters for more than just cookies.  They are great shapes for kid’s crafts, appliqué, needle felting, punch needle and embroidery.
'


I use pumpkin, bell and stars for kid’s crafts at the market.  I trace the cookie cutter on to paper, scan them on my printer so I can enlarge them to the size I need (although I have pumpkin cutters in just the size I needed).   I print them out on cardstock, cut them out and punch a hole in the top then add yarn for a hanger.  Give them to the kids to glue whatever they want on it or just color them.  I was given pompoms of various colors so we have been using those.


I have also used them for appliqué.  Again just trace the cookie cutter; cut it out on fabric and sew it down.  I like the cat and witch cutters my mom had as we were growing up.  They were great appliqués for my Halloween quilt (which one of these years I will finish).


I enjoy punchneedle embroidery.  Recently I found some tie-dyed embroidery floss and wanted to see how it would look stitched out.  So I took several sizes of my heart shaped cookie cutters and made myself a little heart ornament using the floss.

Of course you can also use the shape for some simple red work (or any color) embroidery.  Again just trace the cutter (if desired, you can enlarge it as described above), get out your hoop, needle and embroidery thread, and stitch away.


Cookie cutters are also a great shape for needle felting which is my favorite way to do needlefelting. .  As long as the cutter is open on both ends, you can place your roving in the cutter and needle felt until the roving takes the shape of the cutter.  Then once you have finished felting it, you can use it as an appliqué, stick a thread hanger through it for an ornament or glue a magnet on the back and put it on your frieg.  (I’ll have a future blog concerning needle felting in a shape.)


Making sugar cookies are so much fun and decorating them with children creates memories but using your cutter with fabric and thread (or glue and pompoms) is a way to keep the cookies forever.  Cookie cutters aren’t just for cookies anymore.


© 2016, 2019 Cheryl Fillion


Friday, October 25, 2019

Take Care of Yourself


Recently I learned something about my health and my art.  I had been feeling very tired lately, had a lot of muscle and joint pain, was depressed and had trouble concentrating. The worst part was I had no interest or desire about doing any needlework.

Then I had a doctor’s appointment just for a regular check up.  I decided to tell her about what I had been experiencing.  And she suggested that I had some blood work done which showed that I had hypothyroidism.  All that I had been experiencing are symptoms of hypothyroidism and even more that I hadn’t mentioned here or with my doctor like sensitivity to cold and weight gain. 

Now this condition is pretty common and once I started taking the medicine I began to feel better.  But the thing that surprised me the most was that my desire to do my needlework returned.  I learned that if you aren’t feeling good physically or emotionally, then the things you enjoy doing are difficult.  So you need to take care of yourself, your health. to take care of your art or your passion.  This was an important lesson for me.  I have to take care of myself to be able to do the things I enjoy.  And it was so important to me, I wanted to share it with all of you.

I understand when you have a cold or the flu or something that keeps you in bed, how you just don’t feel up to creating everything.  But chronic conditions that come upon you little by little have the same effect in the long run. So it is important to pay attention to how you are feeling and take care of yourself every day.

I know you have heard this before but eat right, get enough exercise and also get enough sleep.  If you take care of yourself, you are then able to take care of your art.  And also make sure to tell your doctor everything you are feeling or experiencing even if you think it is unrelated (I never put my sensitivity to cold with feeling tired or gaining weight but they were all related).  It will help them determine what is going on with you and what treatment to prescribe.

So for you to take care of your art, remember to take care of you. 

©2019 – Cheryl Fillion


Friday, October 18, 2019

Fabric Covered Notebook


Recently I have started covering little notebooks with fabric.  They make great personalized gifts and are really easy to make.  Our Fiber Artist group spent a meeting time doing some and everyone seemed to enjoy it.

You just need a piece of colored fabric for the outside, muslin or a coordinating fabric for the lining (it can be but doesn’t have to be a print fabric), some batting (although this can be optional) and, of course, a notebook (I got these at a local dollar store).

Mini notebook


I used mini bound notebooks for the group meeting because they were easier to sew in our meeting time but any size would do.   The mini notebooks measure 3 ½” wide and 4 ½” long.  When the book is opened up,  it measures 4 ½” long and about 6 ½” wide. 

measurement of book open flat


To cut the fabric and batting to fit the book, I added 1” to the length.  This gives me 1/4” seam allowance on the top and bottom and a little to extend beyond the book when I make the flap.  You will want to turn the edges of the cover over to the inside of the notebook so the cover of the notebook can slip in it and be held by the cover.  I added 1 ½” to each side. plus  ½” for seam allowances.  So I cut the fabric and batting for these notebooks to 5 ½” by 10”.  You might want to add a little to the length to make bigger flaps.  You will lose some of that 10” in length when you wrap the flap around the edge of the notebook cover. 
fabric and batting layered


This is a project that you can sew by machine or hand depending on the size of the notebook and your hand sewing or machine sewing abilities.  You want to lay the batting down first, then the outside fabric facing up, and then the muslin or lining fabric next (If you are using a printed fabric for the lining you want to have the wrong side of the fabric facing up.).  Think of how you would place the fabric to sew a pillow.  You want the good side of the fabric facing inside and when you finish sewing it, you will turn it right side out. The picture just gives you an idea of how to lay the fabric out as described above, when you go to sew it you want all of the edges lined up (as shown below). And since I wanted to sew this by hand, I marked the ¼” seam allowance on the muslin.


cover ready to sew

Now you can start sewing.  Leave an opening on one end so you can turn the whole cover right side out.  I try to do it at what will be the bottom of the cover so if your stitching isn’t the greatest when you sew the opening closed, it doesn’t show as much.

cover sewn

closeup of opening to turn

Once you have sewing everything, turn the cover right side out and sew the opening closed.  You might need to poke the corners out a bit to get them the lay flat (and using an iron to press the cover flat wouldn’t hurt.) Just make sure whatever you use to poke the corners out, doesn’t go right through your stitching (if that happens just turn it wrong side out again and stitch that opening closed again.).

What I do here is fold the cover in half and put a pin here to mark the center.  Then I place the book binding where that pin is and wrap the cover around to the inside of the book itself.  I mark that with a pin as well.  This is the size of your fabric cover flaps.


Flaps pinned in place


Keep those pins in place and stitch along the edge, top and bottom of the book cover.  Do both sides.  Once your cover is done, you can place the bound book in the cover and you are finished.  Make sure the stitching you did along the flaps holds..  You might have to re-stitch to make it more secure.

If you want you can sew or glue some embellishment on the front of the cover (Just be careful not to stitch through the flap or you might stitch those shut.)   
Finished Notebook

©2019 Cheryl Fillion


Friday, October 11, 2019

Art or Craft


I recently entered a juried art exhibit.  The rules of the exhibit encouraged fiber art and in fact last year my quilted wall hanging was accepted.  But this year it wasn’t.  Now that is OK, sometime artists are at the whim of the jurors.  Whatever the juror interprets as acceptable is what goes in.

I learned after the show that the jurors (it was a committee) in this case was not following the theme of the art exhibit but more if the piece was ‘real art’.  So many times anything made with fiber (other than paper) is not considered art but craft.

So that got me thinking (again) what is the difference between art and craft?   I looked up a number of different dictionaries.  Some definitions had the same elements for both.  Both included creativity or imagination.  Both included some skill involved like painting, weaving, sculpting.  But the big difference seems to be the use of the finished product.

A craft item while it could be beautiful to look at also had a function.  A piece of pottery could be used to serve food or drink.  A quilt is meant to cover a bed.  A piece of embroidery could be part of a napkin or towel. A knitted shawl is meant to keep someone warm.

A piece of art is meant only as a decoration, to be on display.  It has no other function than for aesthetic purposes.  And some definitions added that it was art if on display in a gallery.

Now this is a dilemma many fiber artists face.  The techniques we use whether it is quilting, knitting, weaving, felting are typically used to create things people use in their every day life but those same techniques and sometimes even the finished ‘functional’ product can be aesthetically beautiful, as much as a painting.

Quilting now has a category called “Art Quilts”.  These are often wall hangings that can be as beautiful as a painted canvas (and sometimes the wall hangings are painted).  But because they are made of techniques that if used on a bigger scale can cover a bed, does that make them less artistic?  I don’t think so. 

So how do we change the perception of what Fiber Art is – not just a functional item but a piece of aesthetic art?  That is the question I have been asking myself.  I don’t know if I have the answer but here are some of the ideas I have come up with.

We need to change our idea of ourselves.  It is OK to say “I am a quilter” or weaver or knitter or whatever.  But what if we said “I am a Fiber Artist”?  That is what got me into the Fiber Artists group here in my city.  A Quilt guild member came up to me and told me about the  fiber artist group and added at the end, “And what you do is art”.  Well, OK, sign me up.  No one had ever called what I do – in this particular case with punchneedle embroidery – as art.  Since then I have described myself as a fiber artist.

What if we displayed more of our work on the walls of our homes?  You have woven or knitted a shawl to wear.  Great!  But how would it look if instead of hanging it in a closet when you are not wearing it, you displayed it on your living wall? 

Not only display what you do as art in your home but talk about your needlework as art.  Describe it to others as art.  And don’t let anyone tell you “Oh you just knit” or “That is just a quilt”.  No tell them that is Fiber Art. 

If you have a chance to enter a show or exhibit that accepts Fiber Art, do so.  Even if your piece isn’t accepted in the case of the juried show, you are entering your work as art.   And even if the jurors don’t see it as art such as the jurors supposedly did in the recent show I entered, somewhere down the line, what I enter or what you might enter may change someone’s mind about what art is.

What you do is art whether it is displayed on a wall in a gallery or on the shoulders of your back.  Functional or not, it is beautiful and it is art.

©2019   Cheryl Fillion


Friday, October 4, 2019

The Law of Attraction

Have you ever had a time when suddenly everything you read or heard was about a particular idea?  I am not talking about when you become interested in a subject and seek out information about it.  I mean those times when you pick up a book or turn on the television and there is that particular idea.  Psychologist Carl Jung called this synchronicity.

The idea that has appeared before me in one way or another in the last couple of weeks is what is known as the Law of Attraction.  This is the idea that what you think, feel or create brings to you more of what you think, feel, or create. If you think about flowers, more flowers will appear in your life.  If you think about kindness, more kindness will appear.  It also works with negative ideas but we don’t want to think negative right now.

With that in mind, I find myself wanting to create beautiful quilts and dolls and poetry.  The energy of those beautiful things will then go out into the world and hopefully come back to me. But in the process it will touch others who will then themselves create beautiful things. 

Right now when what you see and hear on television or in the newspaper is about war and crime and hate, take on the Law of Attraction and think, feel, or create those things you love.  The energy of  things you love will go out into the world in many ways and will then prompt others to create things they love and that energy will circle back to you.


© 2019 – Cheryl Fillion

Friday, September 27, 2019

Autumn is here


I came across this blog post and since it seemed to fit my mood of late, I thought I would repost it.   

Autumn is here.  You can tell by the cooler weather, the falling leaves, the harvest of apples and pumpkins, the falling leaves, the shorter amount of daylight, the falling leaves, the Halloween decorations, and, of course, the falling of leaves.   What is also here is seasonal fun.

To me fall is here when I see caramel apples in the grocery store and rows of potted mums near the parking lot.  I love to see the trees change colors.  Where I grew up in Green Bay Wisconsin there was a park behind my Mother’s house.  It was filled with maple trees, which would turn the most beautiful red and gold every year.  I still to this day can’t decided if I liked the color of the trees against a blue clear or gray cloudy sky.  Each sky changed the hue of the leaves just a little. 

I was always thought to be crazy because I enjoy raking leaves.  Still do.  It allowed me to be outdoors in cool crisp weather.  I love the smell of the air while raking – it was fresh and earthy.  And there is something meditative about pulling the rake back and forth as I worked across the lawn.  I love to rake; I hate to bag the leaves.  I always wanted to do what writer and psychologist Leo Buscaglia talked about doing.  He liked walking through piles of leaves so much he wanted to bring them into his house.  It’s not so crazy, he would add, when you think that people bring whole trees into their house at Christmas. So what’s a few leaves.  And as he would say, “I am not asking you to clean them up.”

Autumn provides a wonderful way to have fun.  It is time for outdoor activities now that the heat of summer has passed.  Why do we need to bag up the leaves?  Put them in a big pile in the middle of your yard and jump in them.  Take a handful and throw them up in the air like confetti.  Roll around in them until your hair is tangled in leaves (you might want that as your Halloween costume.)

Of course Halloween is the highlight of autumn fun.   Halloween was originally associated with death and the supernatural, falling on the eve of All Saint’s Day, a holy holiday for Catholics and Anglicans.  Now it is a day of fun and parties and dressing up in costume.  It allows children of all ages to fantasize.  I have never been a costume person but my favorite one was an old sheet and a plastic mask to be a friendly ghost when I was about 7. I have liked ghosts ever since. 

I remember that holiday as one where my mother created my brother Jim and my costumes.  I can see her on our living room floor copying in white paint the design of a skeleton on to a black costume she’d sewn for Jim.  I know it was a lot of work but my guess is that she enjoyed doing that much more than buying a store bought costume.

Autumn and Halloween is when you can have fun and try your hand at something new.  Carve a different face on the pumpkin you bought.  Roast the pumpkin seeds if you have never done that. Try a little bit of costume designing of your own.  Dance a jig in the pile of leaves you have in the back yard (and when you are done, rake them to a corner of the yard and let them decompose through the winter into compost. It will be great for your garden in the spring.) Decorate your house with goblins and ghouls or leaves and gourds.  Try some new apple or pumpkin recipes.  Let the season into your house and life.

Autumn is here and it can be fun.  So try something new and creative.

© 2016, 2019 – Cheryl Fillion


Friday, September 20, 2019

It’s Football Season!!


It’s football season.  Anyone who is a fan has been counting down the days since the

Superbowl game.  For me it means getting out my favorite team’s glass and cup to use on game day.  (I am a Green bay Packer fan. Green Bay, Wisconsin is my family’s hometown.)

Recently I bought a set of cookie cutters which included a helmet and football shape.  Now I didn’t buy these cutters for cookies; I bought them for needle felting (See my blog post “Needle Felting in a Cookie Cutter”).  But I began to wonder what other things the cutters could be used for.  

So here are ten ways to use the football and helmet cookie cutters (but any shape and any occasion will work here).

1- Use the shape to needlefelt an ornament or press the cookie cutter into clay for an ornament.

2- Trace the shape onto a blank card and decorate it for an invitation to your football watching party.

3- Trace the shape onto a blank card but leave the shape plain.  Tell your guests they have to bring the card colored or decorated to the party and a prize will be given to the best card.

4- String yarn or a chain through the cookie cutter and wear it as a necklace.

5- Having coloring sheets with the shapes on it for the children or adults to color if the game gets boring or your team is losing.

6- Use the cutter as a template for appliqué, embroidery or coloring on fabric.  (See blog post “CookieCutters are just for Cookies” and “Colored Pencils on Fabric”).

7- Use the cutters to create different shaped deli meats or cheese for your food table

8-Tic Tac Toe game – Create a 9 patch ( a 3 x 3 square grid) with the squares big enough for the cookie cutter shape.  Pick 2 shapes and make five of each.  You can use paper, card stock, felt, or fabric.  You can also use one shape like the helmet and make 5 from 2 different colors.  Use the shapes as you would Xs and Os in a tic tac toe game but instead of marking a paper, you place the shapes on the squares.

9- Use them as napkin holders.  If you have just a couple of sports related cookie cutters, add stars, circles, hearts, fall leaves, whatever might be appropriate or fun.  (If the weather is still warm or even if it isn’t try a snowman).

10- Oh, yeah, and make cookies with the cutters.


Remember what I said in an earlier blog: cookie cutters aren’t just for cookies.  So go have some fun with football or any cookie cutters.


©2017, 2019  Cheryl Fillion

Friday, September 13, 2019

Bookmarks as a Group Project


Our Fiber Artist group meets at a library.  It is easy to get to, free to use and more welcoming than a church or someone’s home.  We occasionally try to give back to the library by raising money for their Friends of the Library group which funds many of their programs.  This month we made book marks for the library to give out.   Now to be totally honest we do get public credit for these bookmarks which help us advertise our group. 

As I was making my bookmarks which I geared toward kids, I thought this was a great idea for a scout group or a Sunday school class to do as a simple public service project.  It wouldn’t have to be for a library, it could also be for a class like maybe a first grade class where they are just starting to read.  Or it might also be a great introduction to collage for some afternoon art class.

We started with card stock cut in 2 ¾” strips and decorated them with stickers and ribbon and sequins.  A couple of us added words to encourage reading.


Another member brought some ribbon and a hole punch and added a little bow at the top of their book marks.


Instead of plain card stock you could cut strips from scrapbook paper or wall paper sample sheets.


It was a lot of fun and didn’t take much concentration so we were able to visit and tell stories and talk about books we were reading.  Think of how encouraging this would be for the group making the bookmarks to read more.  Maybe even allow them to keep one of the book marks they made and have them bring it to the next scout or class meeting with a book they are reading. 

 ©2019 Cheryl Fillion